
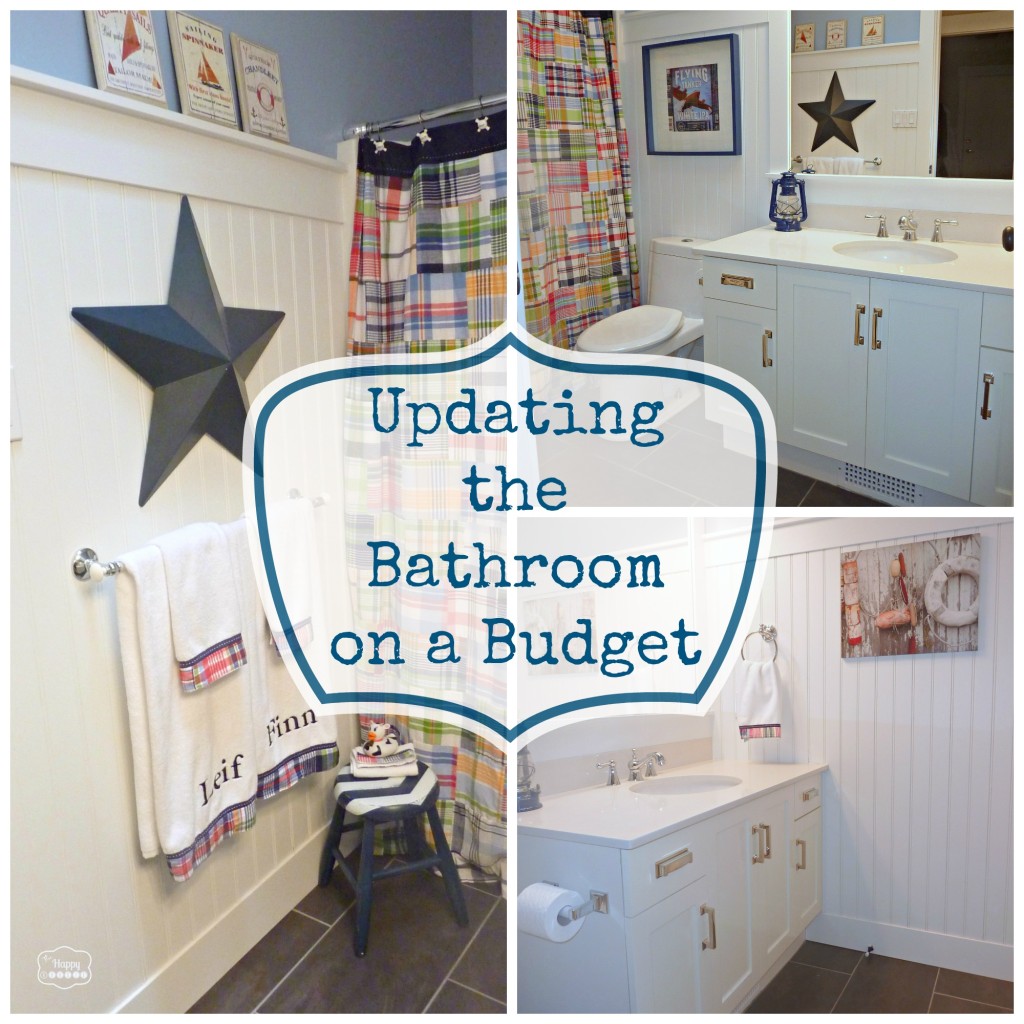
How to Update a Bathroom on a Reasonable Budget
I am sharing my best tips on how to update a bathroom on a reasonable budget!
Hello everyone! We have been working on some big renovation projects around here and I can’t wait to share them with you… BUT…we are not….quite….there….yet… So, instead, today I want to share with you a few tips on how to update a bathroom on a reasonable budget. We tackled our Main bathroom not long after moving in and I am so glad that we did! And if you are popping in from Serenity Now… {where I am sharing a little nautical stool makeover today}, then welcome!
When we moved into our new house, the Main Bathroom (that is also the bathroom that our boys use) looked like this:
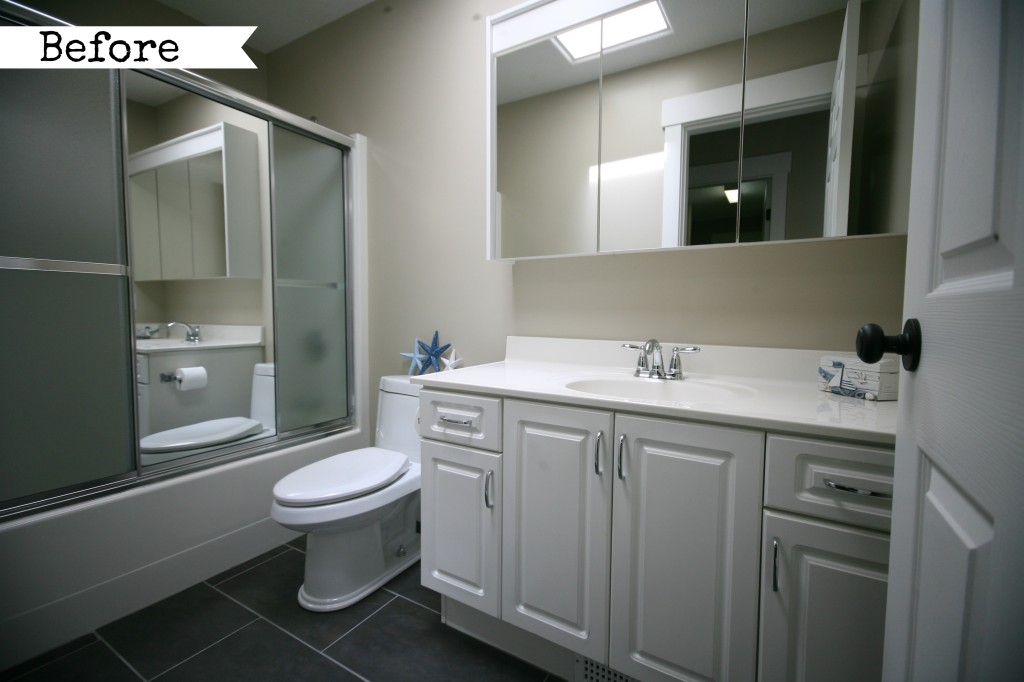
Pretty basic… clean and fairly sterile with shower doors that I couldn’t stand and a medicine chest/mirror unit above the vanity that seemed to stick out about 18 feet into the room. We were thankful to have nice tile floors to work with and didn’t want to gut the space… so we tried to add some warmth and rich character with a few small save and splurge changes.
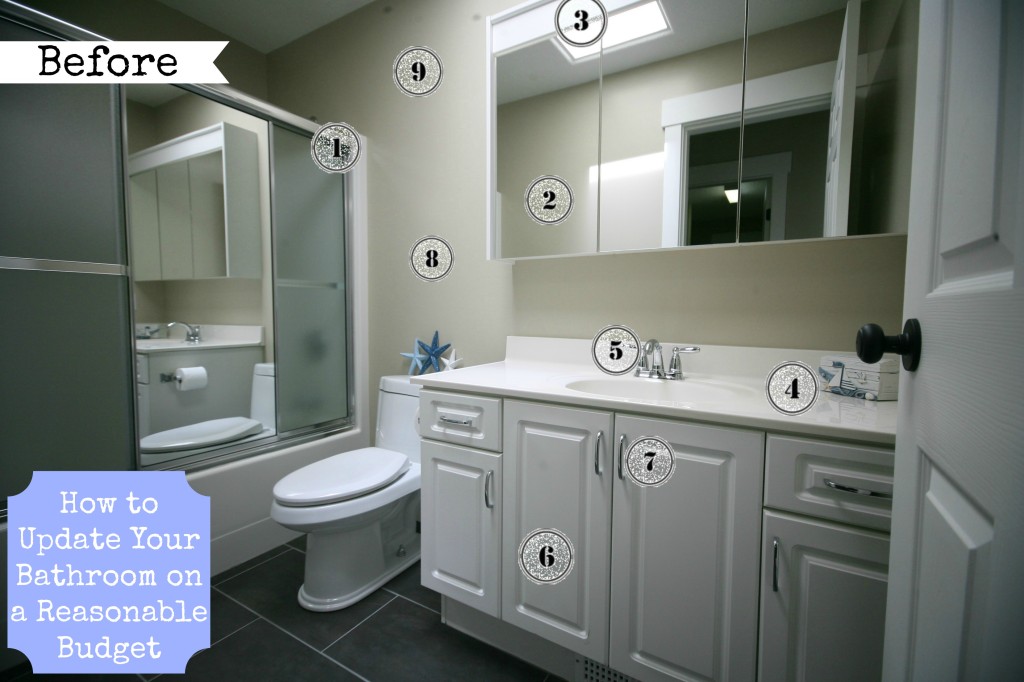
1) SHOWER DOORS:
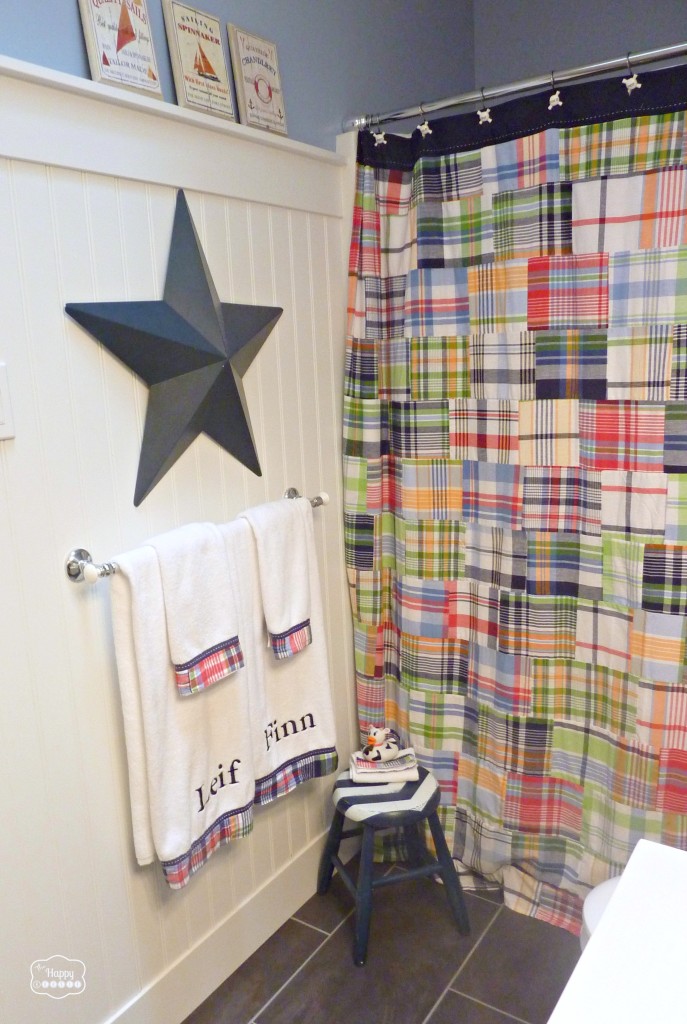
We removed the shower doors, scraped off the adhesive and silicone, and patched the holes where the screws had been using little caps from the hardware store. We replaced it with a rod and shower curtain that I got on clearance through Pottery Barn Kids online (the pattern is Madras Plaid). (total cost: about $45).
2) MEDICINE CABINET:
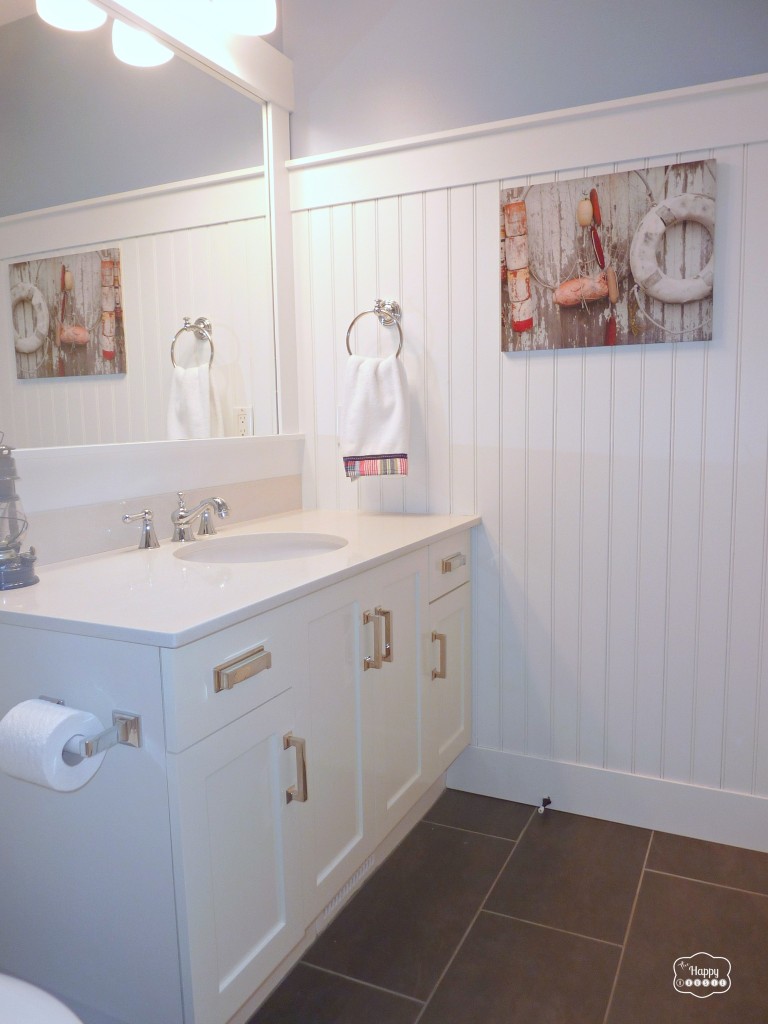
We removed the oversized dominating medicine chest and replaced it instead with a plain mirror that we framed out using MDF molding. We decided on the frame size we wanted and ordered a mirror to fit within that space. We attached the mirror to the wall using PL 400 Adhesive glue and routered out the side edges of the MDF frame boards so that they overlapped the mirror on each side by about a 1/2 inch. We attached the MDF boards around the mirror using glue and a nail gun, filled the joints and nail holes, and painted it all out in the same trim color as the rest of the room. (total cost for mirror and framing materials: about $100)
3) LIGHT FIXTURE:
The ‘light fixture’ was originally part of the ginormous medicine cabinet so when we replaced that we bought a new light fixture from Home Depot (this is part of the Martha Stewart line they carry there). (total cost: about $75).4) COUNTERTOP/SINK:
Okay, I’m not going to lie… this area was a major splurge. I really wanted stone countertops. We were able to get some through a local granite/stone supplier and installer and for the countertop and sink together installed we paid about $400. Not cheap, but I think it adds such a great high end polished look. And since we didn’t replace the bathroom vanity (just the doors) or any of the other fixtures we could afford to splurge a little somewhere – and this was it. (total cost: $400)
5) FAUCET:
I watched for sales and managed to get a faucet that I loved on sale for $35! (total cost: about $40 with tax)
6) VANITY/CABINET DOORS:
The melamine doors were looking quite dated and the melamine had actually detached itself from the MDF base of the doors… so they had to go. But the cabinet boxes were still in great condition so we just replaced the doors. You can do this through places like Home Depot but we are very fortunate that my Dad built us some new shaker style doors and drawer fronts and I painted them with an oil based paint (for extra durability). (total cost of wood and paint: about $60)
7) HARDWARE:
We bought some new door hardware at our local hardware store- I may have been able to find a better deal online but since we only needed a few of them I splurged a little – the handles were just under $6 apiece. (total cost: $40 with tax)
8) PANELING:
We really wanted to put up some high wainscot style paneling – this paneling is four feet in height so with the baseboard and top trim board it goes up to the five foot mark on our walls. I love the height of it and I think all the white makes this tiny, tiny, tiny bathroom feel just a little bit bigger and much fresher and brighter. Normally this amount of paneling might run you anywhere from $50-75 dollars but we were gifted some leftovers by a very friendly neighbour. Yay! I think that paneling is always worth the added expense in a room because it adds so much character and interest. (total cost for paint: $35)
9) PAINT:
Always the best bang for your buck… we only needed a small can of the blue paint that we used above the paneling. (total cost: $15).
Budget Breakdown:
All in all we spent right around the $800 mark. Not exactly a low, low budget but pretty darn reasonable for what we managed to achieve {I think}. I feel like it has a much higher end look then it did before and we managed to do that by DIYing the whole thing and choosing what we saved and splurged on very carefully.
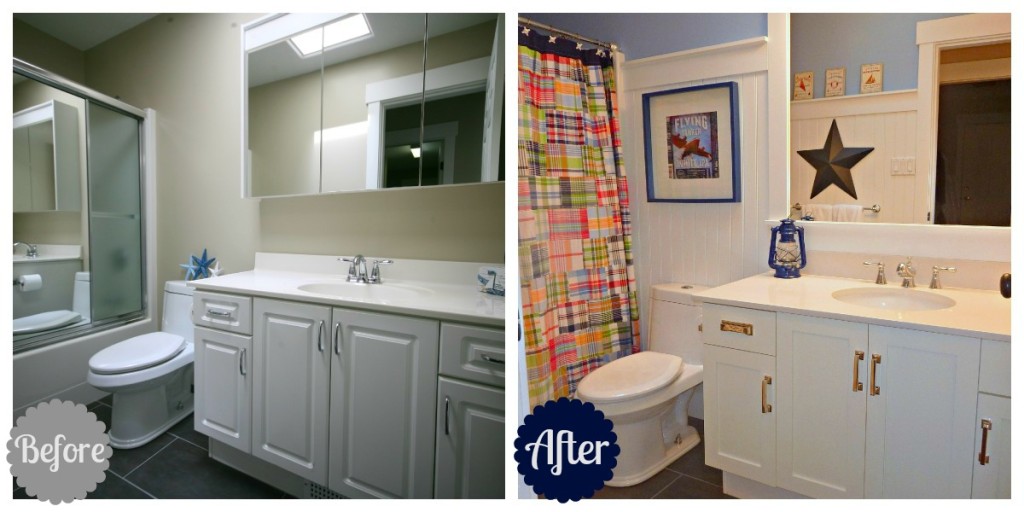
What do you think of our new bathroom? Better after?
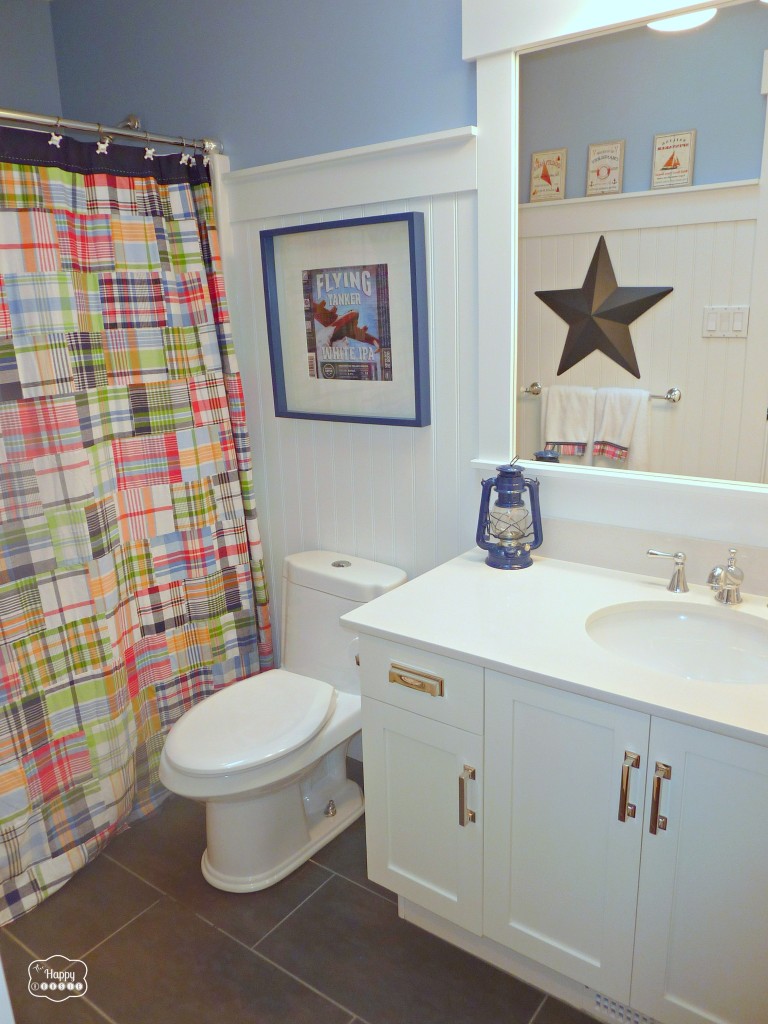
Oh, and that print above the toilet has a funny story… it is actually a label from a beer bottle. We live on a lake that is home to two ‘water bombers’ that are now used for putting out forest fires but at one time flew in WWII. A local island brewery has produced Flying Tanker Ale the past couple summers and I loved the label so much that I peeled it off, scanned it, and had it printed at Walmart in a larger size.
I love this cute little bathroom now… and spend a great deal of time in it brushing teeth…bathing children… and scrubbing the floor (almost daily, with two little boys;) .
As I mentioned before, I am sharing a little stool makeover project today over at Serenity Now… you can see how it turned out (down in the corner of our bathroom), and I must say it is one of the most-used parts of this whole bathroom DIY project.
Thanks for reading. And remember my housie friends, HOME isn’t built in a day. Enjoy the journey.


This post was featured at!

I may link up at some of these fabulous places below, for more info check out housie parties:
Make the Scene Monday , Monday Funday , Give Me the Goods Monday , Inspiration Monday, Craft-o-Maniac Monday, Nifty Thrifty Tuesday, Project Inspire{d} , Inspire Me Tuesday, The Scoop, Hit Me With Your Best Shot, Wow Me Wednesday Whimsy Wednesday , Fall Into Fall , From Dream to Reality, The Inspiration Exchange, Live Laugh Rowe Live Laugh Linky, Thursdays Are Your Days, The Weekly Creative , The Creative Connection, Inspire Me Please, Catch as Catch Can, Fabulously Creative Friday, Party Junk, Pinworthy Projects , Link Party Palooza,, Weekend Bloggy Reading, Strut Your Stuff Saturday, Spotlight Saturday, Get Schooled Saturday, Overflowing With Creativity , , Suburbs Mama , That DIY Party


What size boards did you use for your trim at the top and bottom? How did you connect the two – did you overlay the trim boards on the paneling or just butt it up against each other? How did you hide the seams of the paneling?
Looks great, want to do this to my bathroom and wanted just a little bit more information.
Hi Grace- we used 1×6 MDF as the baseboard and top board. The baseboards were actually already in place, and we just butted up the paneling directly on top of them. The paneling is tongue and groove so we didn’t have issues with seams (as it wasn’t the sheets of MDF paneling like you sometimes see). My go-to to make any paneling or trim project look finished and professional is “DAP” – it fills all kinds of cracks and holes and gaps – and it paintable. Good luck with your project!
This bathroom is adorable! I can across your blog from Pinterest. I am using the PBKids Madras bedding in my son’s room and I have been looking everywhere for a Navy Blue star! Where did you find yours? I will definitely be coming back to your blog to get more ideas for other rooms of my house!
I know you said the tile was there when you moved in, but do you have any idea where it’s from? It’s a nice looking, versatile floor!
Hi Stacey,
I don’t actually know where it is from – but I was at Home Depot yesterday and saw a similar dark grey tile there. I think if you explore places like that, or tile shops, you will easily find a beautiful dark grey 12×24 tile. Good luck!
I love what you did to this bathroom! Can you tell me the wall color?
Hello Jamie!
Thank you:) It is called Glace Bay by Benjamin Moore. Good luck with your painting project!!
Firstly, amazing transformation! I’m interested to know if the curtain over the bath/shower is actually a shower curtain? You do fabulous things! 🙂
Thank you Krista! The shower curtain is really a shower curtain – it is from Pottery Barn Kids -called Madras Plaid. I bought it on an amazing sale as I think they may have been clearing out of them. That probably doesn’t help you! Sorry:) Thanks so much for popping by and your kind comment!!
Gorgeous transformation! The beadboard really makes such a difference and the new mirror is lovely!!
Thank you Chelsea! We did the same kind of framing around a standard mirror in our ensuite- I love how big and bright it is and how it matches the window trim in our house. You certainly need all that light and reflection in such a small bathroom as our main bath is!
What a great transformation! I love the story behind the art, the hardware is awesome and the paneling is my favorite 🙂
Hi Katie! I think the paneling might be my favourite part as well. I am starting to think that this whole house may end up paneled!
Your bathroom is adorable! Really inspiring!
Thank you so much Laurel!! So thrilled you came by!
Beautiful, Krista! Thanks for the tips! I have a couple bathrooms that could use some sprucing up! 😀 Hope you have a wonderful Wednesday!
~Abby =)
Thanks Abby! The nice thing about bathrooms is that they are usually a small contained space to work on so even a few changes feel like they make a big difference!
Ohhhh I’m totally stealing the idea of printing out a beer label or anything that might be a great memory from a place you have been and scanning it for a frame, great idea. You did a REALLY great job on this bathroom it looks fantastic!
Thank you Sonnet! I loved those labels when I saw them and knew I had to use them somehow… it took some careful peeling to get the label off in one piece!
Oh my goodness, Krista! I’m sorry I’m late to this party, but this bathroom turned out so perfect! I really love the paneling in there. It adds so much interest. Our kids’ bathroom had those horrible shower doors too (they always get so gross!), and we ripped them out first thing when we moved into our house.
Hi Alexis! I can never understand putting in those shower doors- they close off a bathroom so much. But I guess some people don’t like shower curtains? Give me a gorgeous fabric shower curtain any day over those monoliths. I think the paneling is my favourite thing about the room too.
I love it. You did an amazing job. Thanks tons for linking to Inspire Me. Hugs, Marty
Thank you so much Marty! And thanks for hosting each week:)
Awesome job on the bathroom. It looks lie a totally different room! Love the beadboard walls and the way you decorated. ~Deborah
Thank you for your super kind comments Deborah!! And thank you for coming by:)
I love what you did with this bathroom! I think the paneling is my favorite part–it adds such character and warmth to a once sterile bathroom. Pinning this for inspiration for my next bathroom makeover!
I agree so much Carrie! Paneling always adds so much to a space!! Thanks for the pin and the visit:)
You did an Amazing job on the bathroom, you should be so proud…. Your post gave me inspiration to do my bathroom like this. Im building a house and the beaded board is a great feature Thanks Maria
Hi Maria! How exciting to be building a house- I have always wanted to do that. So many choices to make though! I think that bead board and other types of paneling (like board and batten) add so much character to a space – it will help give your brand new house instant character!! Good luck with the process and thanks so much for your visit:)
Your bathroom is beautiful. I’m planning a makeover for our powder room and wainscot is on the must-have list.
Hi Bonnie! I love the wainscot – it added so much character and in a small bathroom all that white really brightened it up and made it feel more spacious (at least, a little more spacious:). Good luck with your powder room makeover!!
Oooh I LOVE the Wainscoting! And of course the gold hardware <3 Changing out that 18 foot medicine cabinet was a very good call. Definitely loving the bathroom after!
Thanks Amy! That old cabinet was so big you could hardly get in the room:) I think it looks and feels completely different- even more then the pictures can really show. Thanks for your visit!!
We have *got* to do something with our boys’ bathroom. Your makeover if just the inspiration I needed! Wonderful job!
Hi Ashley!! Thanks for your sweet comments! I felt the need to do this room first in the house since it is also the bathroom that guests use (which can make for interesting cleaning frenzies since my two boys ‘use’ it daily as well!). Thanks for your visit!!
It looks great! I love a makeover on a budget! And the paneling is the perfect touch!
Thanks Sabrina! I agree – the paneling pretty much makes it. But I am a paneling addict- even have a whole board dedicated to it on Pinterest! Thanks so much for your visit:)
GREAT tips Krista!! They will come in very handy for me (we are working on our bathroom)! LOVE your bathroom!
Thanks Christine!! I can’t wait to see what you do with your bathroom. I love how bathroom projects are such a small contained space so you get a real sense of change and completion when they are all done. Good luck with your project!
We also redid our guest bathroom on a budget. Yours looks great and thinking about boys using it, this style is perfect. You can see our redo here
http://foreverdecorating.blogspot.com/2014/01/updated-guest-bathroom-reveal.html
Hi Terry! The style of their bathroom links really well with their bedroom- that we are just now working on! Thanks so much for your sweet comments and visit- can’t wait to check out your bathroom!
Gahhh! I LOVE it Krista!! You really did an amazing job! I have shower doors on my tub and I hate them! They have been half uninstalled for months….I really should tackle the bathroom, this was great inspiration! You go girl!
Hi Mindi! The nice thing about a bathroom project is that it is pretty small and self-contained so it can be a pretty fast project…though ours did take us a while! So glad you found a little bit of inspiration. I still had a baby to bathe when we moved in so that shower doors were a serious nuisance!
WOW, Krista! I can’t believe this is the same bathroom!!! And only $800?! That’s amazing. I love what you did–the colors, the stone, the wainscotting–love it all! I know it wasn’t part of the renovation, but I have to tell you that I love the tile floor as well. And, I know this is also a strange thing to compliment, but that’s the prettiest toilet I have ever seen! GREAT JOB! Pinning!
Haha Tasha- yes, it is a nice looking toilet. They put the same new toilets in throughout the house – though unfortunately we have issues with the downstairs one running (and it led to a flood last summer = ahhh!!!!). It is great when you move into a new house and like the choices they made (like the tile floor that runs throughout much of the main floor– imagine if I hated it??). Thanks so much for the pin!!
I love when no need to do major projects to get a fresh new look to a room! Well done, Krista!Xoxo~
Thanks Aniko! Yes, it is nice to not have to ‘gut’ a space and just get to add and decorate instead!! Thanks for your kind comments Aniko!
Love your bathroom redo!!
We’re in the middle of updating ours (also on a budget) so this was so inspiring to see!
Hi Selene! Exciting- it is so satisfying to see an updated bathroom completed! Good luck with your project and thanks for your sweet comments!
What a beautiful transformation! I especially love the panelling!! SO pretty!
Thanks Jo-Anna! I think the paneling is my favourite part too!! Thanks for your visit and kind comments!
Darn, not sure if my comment came through or not. But basically it was this…great job. Looks beautiful, we did the exact same thing to our upstairs hall bath (looks so very similar) except we did have to re-tile the floor.
We made doors to match the beadboard to replace the old 70’s style ones.
Great job!
Nancy
Thanks Nancy! Isn’t it great when you can just add new doors to give your vanity a new life. We are planning to do the same thing in our kitchen this spring- new doors on the old boxes (which are still perfectly fine so why spend thousands on all new cabinets??). Thanks so much for your visit and comments!!
This is a pretty awesome bathroom makeover. I love the theme too! Pinning!
Thank you Thea! Thanks for the pin too!!
I love your bathroom!!! It reminds me of Maine and I miss living on the coast. You guys did a really beautiful job. Well done.
~FringeGirl
Thanks Tricia- I am definitely going for that coastal cottage feel in this house. Each house that we have lived in seems to take on it’s own look….but this might be my favourite.
That bathroom is so stinkin’ cute now!! I love it for two boys.
We have a boy and a girl and recently started working on updating our main bathroom too. Ours was original to our 30 year old house though. Floors had to be ripped out and a new vanity put in. I actually got my inspiration from your house when we started. Come have a look, you may recognize something 😉
Anyway, it’s still not full complete but we are slowly getting there.
http://theimpatientremodelers.blogspot.ca/2013/10/kids-bathroom-update.html
You did an amazing job transforming the bathroom on a budget! I love the beer label idea!
Thanks Mary! I went as far as to phone the beer company to try to get a poster of the label but they didn’t have any left so I ‘made’ my own. Those water bombers are a pretty big landmark around here so I was thrilled to get that fun print of them.
Krista this is beautiful! I love your flooring? It is tile or slate? Your bathroom is a perfect cottage bathroom now 🙂
Hi Mandy! It is tile- the same tile runs throughout the main floor hallway, entry and kitchen. The previous owners put it in just before they sold- glad I like it because there is a LOT of it!! The bathroom links well with the boys’ new bedroom- can’t wait to share some of that!!
Love how much personality you added to this bathroom with so little $$. The beer bottle label picture is perfect. Pinning…we still have a bathroom reno in our future!
Thank you Courtney!! Those are big compliments coming from you after what a stunning bathroom you created! So thrilled you came by and thanks for the pin:)
What a charming bathroom!
Thank you! It is certainly well ‘loved’ now!
don’t know if my comment took or not! sorry if this is a duplicate.
This is so pretty (and so much better!!) I love the walls and that shower curtain is perfect. Great job Krista!
Thanks Anne! Adding the bead board in white brightened it up so much! And who can resist Pottery Barn on clearance? I love a deal like that:)
The bathroom looks great! LOVE that shower curtain and the hardware on your cabinet doors!
Thank you so much Brittany! I am so pleased with how it all turned out:)
Love your bathroom! Where did you get the pics you have?????
Hi Kris! The picture over the toilet is actually a scanned copy of beer label from a special edition beer (it featured the Mars Water Bombers which are a big landmark in the lake that we live on)….the other canvas print I picked up at a local home décor shop, and the little nautical themed prints were from a liquidation store several years ago. Thanks so much for your kind comments!!