
DIY Plank Wall {Project One in the Boys’ Bedroom}
One design feature that I love is a plank wall and we have completed a wood plank wall in the boy’s bedroom!
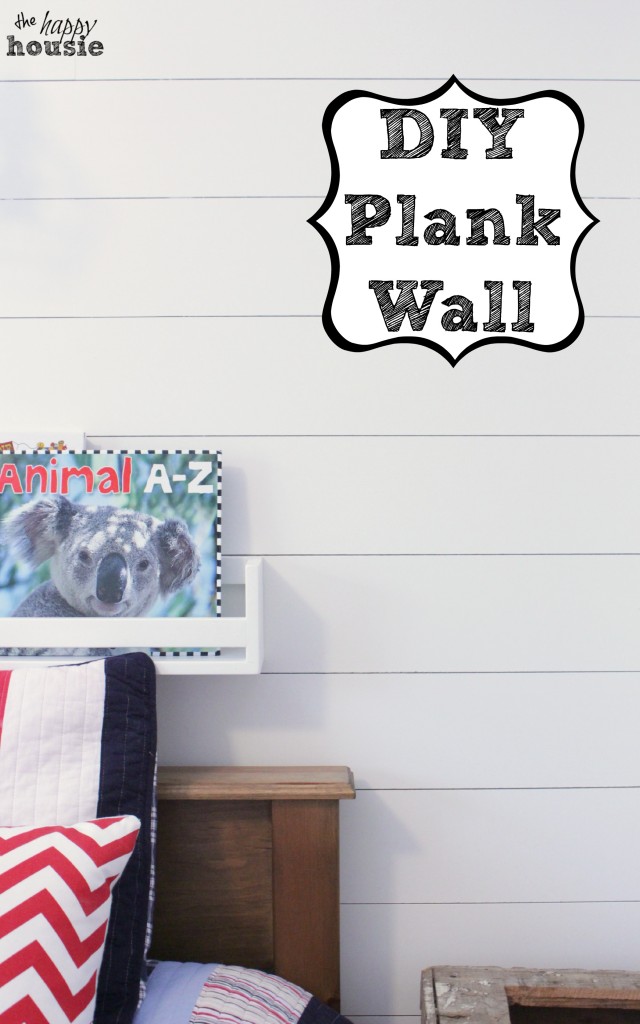
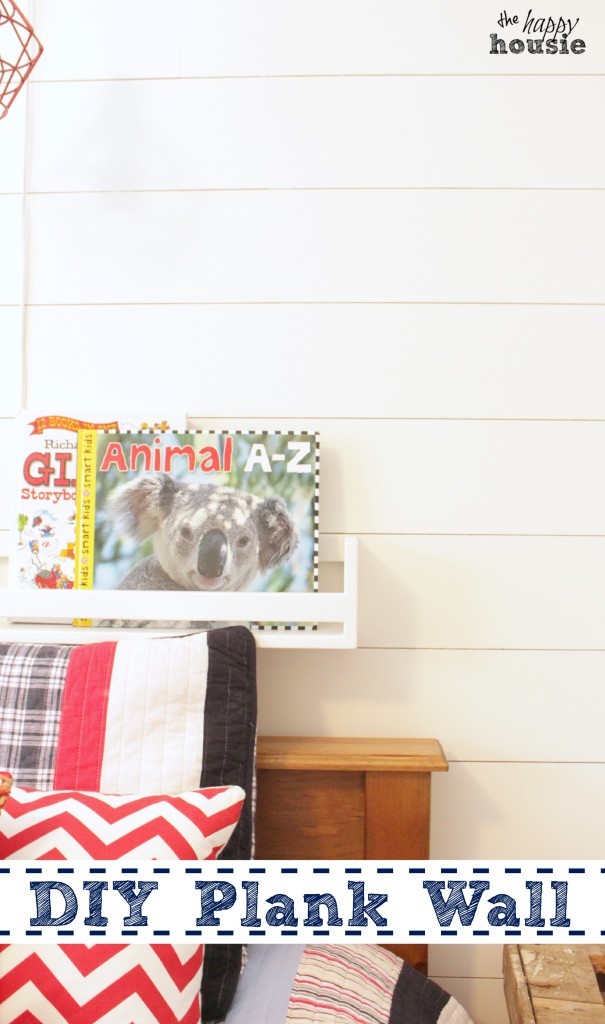
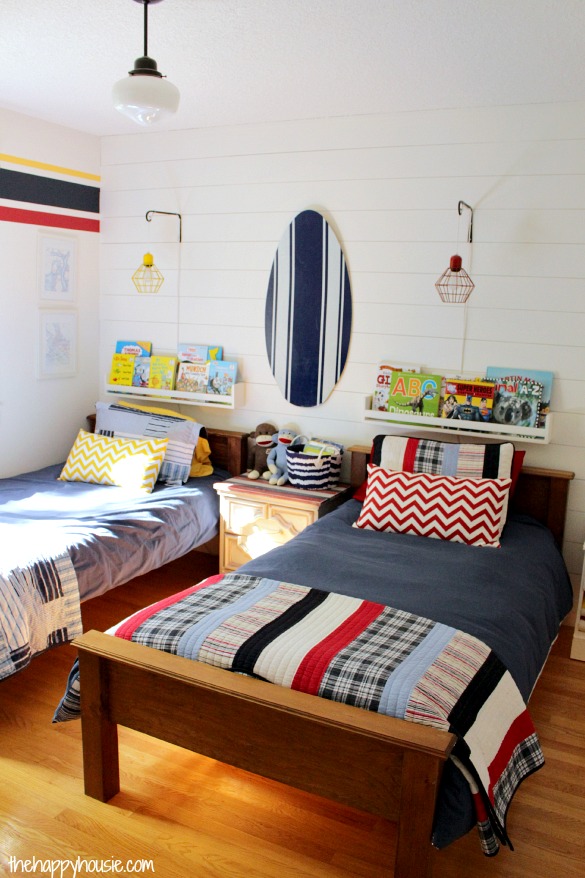
Today I can’t wait to share the first big design project that we completed for our Boys’ Bedroom – a DIY Plank Wall. This project was actually fairly easy to do and I absolutely love the texture and interest that the plank wall adds to the room. We toyed around with what type of paneling we wanted to add to their room and I am thrilled that we went ahead with a DIY plank wall. These horizontal wooden planks add so much interest and are the perfect backdrop to the boy’s twin beds.
I read a few great tutorials on how to pull of a DIY plank wall before we began this project, in particular these ones by Shayna, Allison, Danielle, and Taryn, and Shelley. After reading through the different techniques and suggestions and wrapping my head around the process I managed to rope my Dad into helping me with this project while my husband was out of town on business. (Thanks Dad!!).
All in all, doing a DIY plank wall was a pretty straight forward process, so if you are thinking of doing it don’t let fear hold ya back.
Plus, you might get to use a nail gun and that is crazy fun.
![]()
Materials for a DIY Plank Wall:
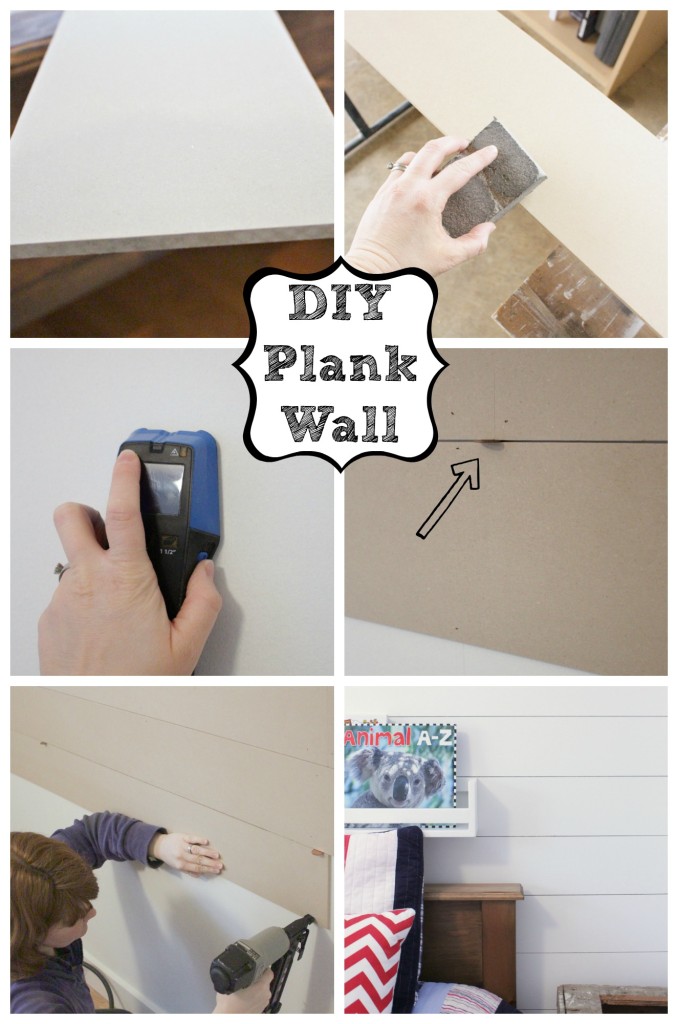
– MDF planks (6″ wide by 8′ lengths which we cut down to size)
– compound mitre saw to cut the planks to length
– nail gun and air compressor (you could also use a hammer and nails)
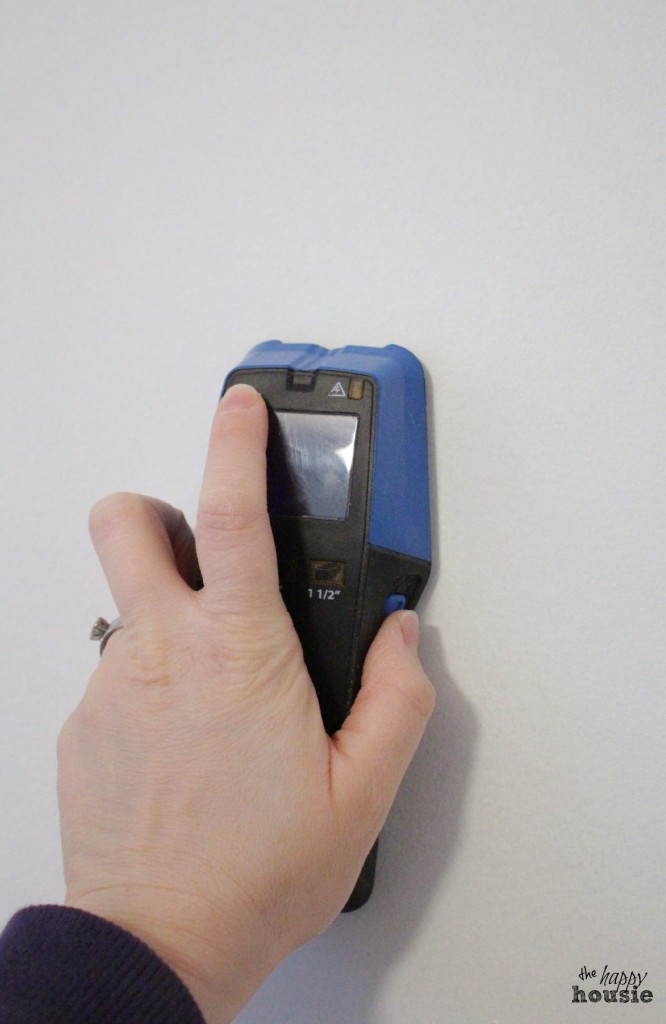
– measuring tape, pencil, and stud finder
– table saw (used to rip down the trim board for the gap between the first row of planks and the ceiling)
– level
– filler, primer, and paint
To begin, I drew a little graph using the dimensions of my wall first in order to figure out how many 6″ strips I would need to cover the wall with planks.
I kind of have a thing for drawing little graphs.
Next I visited to my local hardware store and buying three sheets of 1/4 inch MDF and having them cut it into 6″ strips. I had to pay for the cuts but it was well worth it because it saved my Dad having to rip it all down using his table saw. I have to admit that the guys at the hardware store weren’t totally thrilled with my request…
To prep the MDF we lightly sanded the edges where the strips had been cut just to make sure they were smooth.
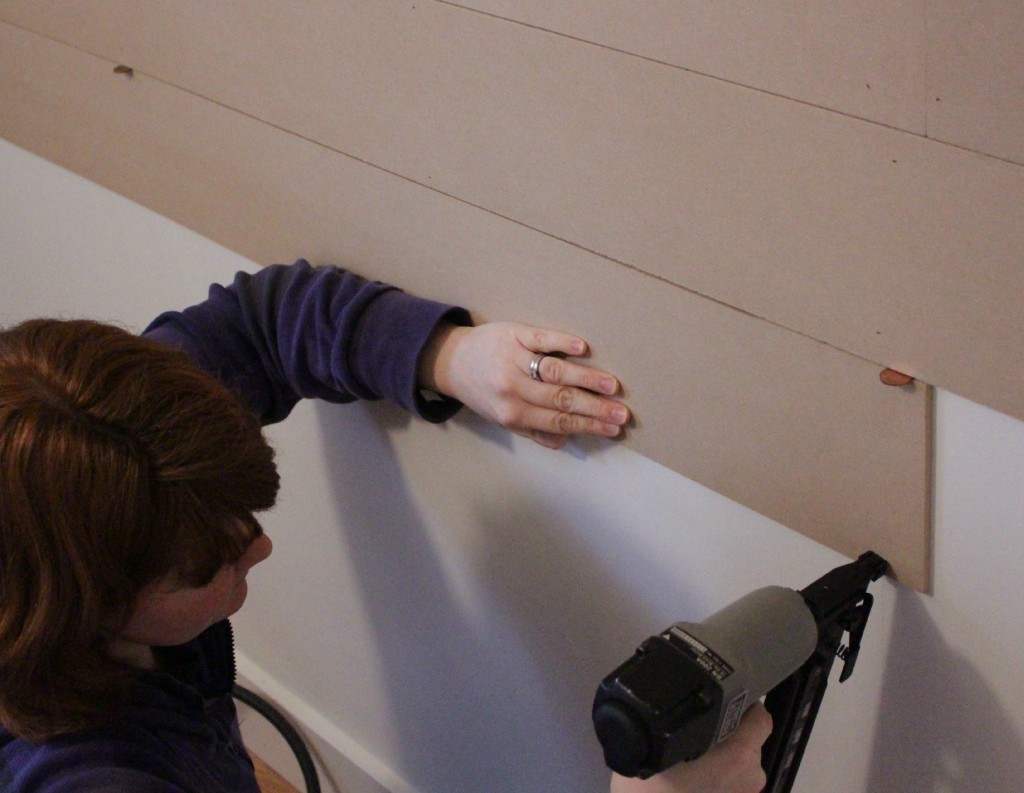
I had primed and painted the wall before starting so that none of the original grey paint color would show through between the gaps. We first used a stud finder (like this one as well as a nail and hammer) to find the location of the studs along the wall and marked these to ensure that we nailed directly into the studs.
We started at the top of the bedroom wall and used a level to ensure that the first board was completely level. Apparently the ceiling wasn’t level so there was a gap between the ceiling and the first board that was wider in some spots along the wall. I will show you how we ‘solved’ that issue down below. Once we got going, the process went really quickly. We staggered the joints so that in one row there would be a long/short and then next row would be short/long. We simply attached them with the nail gun directly into the studs. If you don’t have access to a nail gun you could definitely just use a hammer and small nails – the gun just speeds up the process.
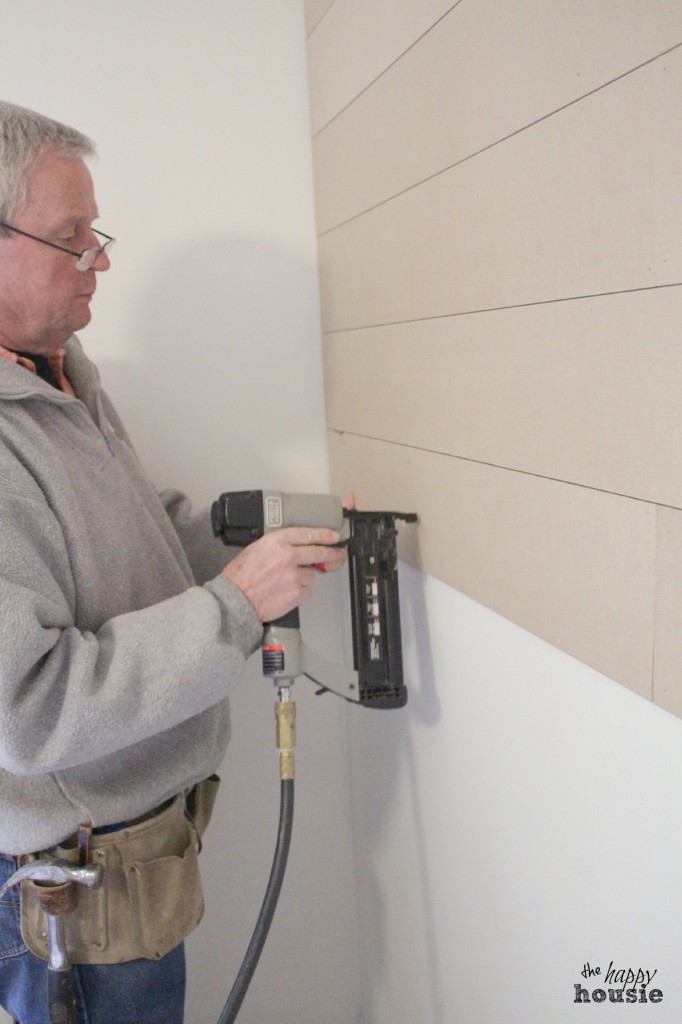
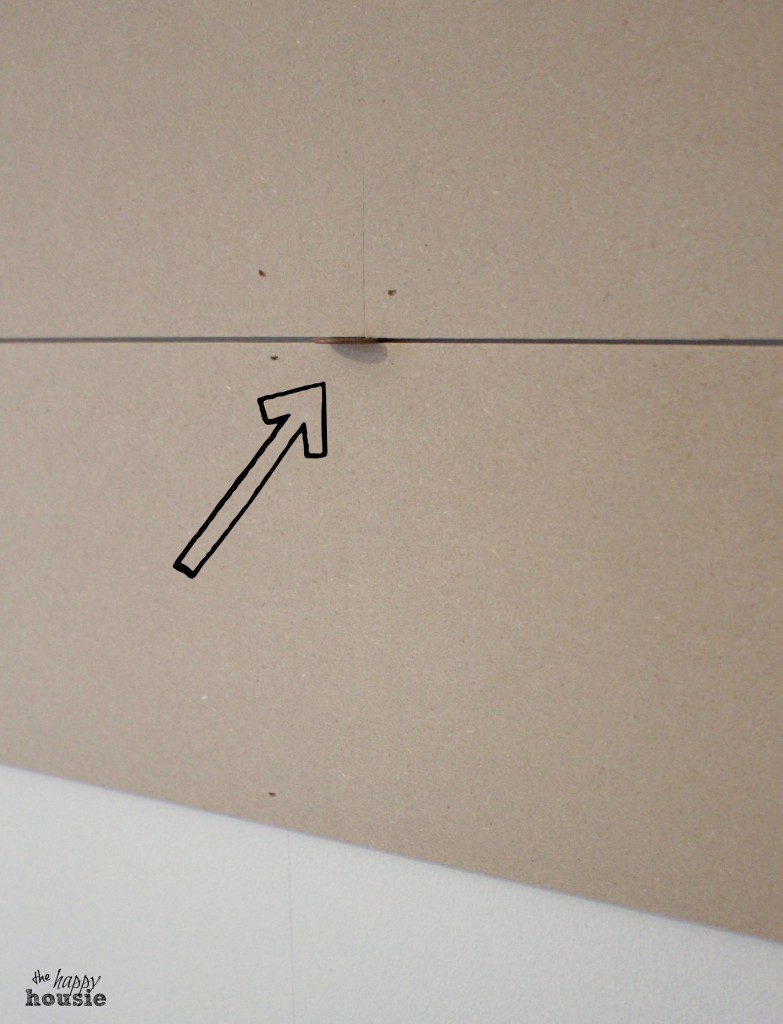
We used pennies between the boards as we nailed up the next one in order to keep the gaps the same all the way along.
Like I mentioned above, once the wall was finished, we needed to do something to disguise the gap between the top level board and the ceiling. My Dad ripped down a couple of pieces of the MDF into about a 1.5 inch strip to act as a trim piece that would cover the gap. Below you can see the way it looks once we nailed it into place between the top row of planks and the ceiling.
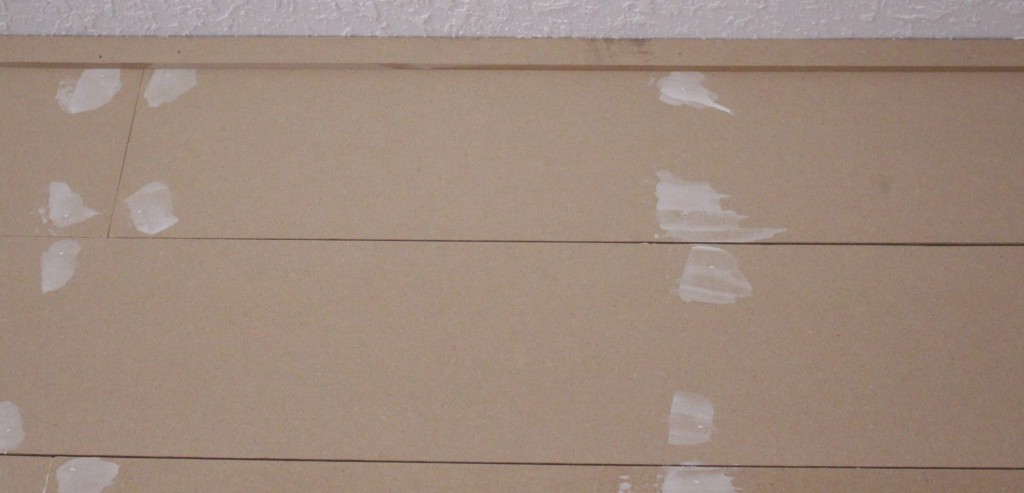
You can also see that I filled all the nail holes with polyfil and then sanded it smooth once dry. I covered it all with a coat of primer followed by three coats of white paint (Cloud White by Benjamin Moore). In fact, the whole room got three coats of white paint while I was at it. Painting with white is awesome- it was the same color as the trim so I didn’t have to worry about my usual spill-overs of paint and didn’t have to pre-tape anything.
I’m pretty thrilled about how the whole thing came out…as well as being thrilled with the fact that I avoiding nailing any part of my body or clothing to the wall during my first real nail gun experience. I’d call that a great success.
Well, what do you think?
Do you see a DIY plank wall in your future? Do you like planked walls? Or more traditional types of paneling? Have you used many power tools yourself? A nail gun? I must admit that it was pretty addicting. So much more power then my usual glue gun. And that little ‘chu-chu’ noise it makes satisfies some kind of primal power tool urge.
Thanks for reading. And remember my housie friends, HOME isn’t built in a day. Enjoy the journey!


This was featured at!


I may link up at some of these fabulous places below, for more info check out housie parties:
Make the Scene Monday , Monday Funday , Give Me the Goods Monday , Inspiration Monday, Craft-o-Maniac Monday, Nifty Thrifty Tuesday, Project Inspire{d} , Inspire Me Tuesday, The Scoop, Hit Me With Your Best Shot, Wow Me Wednesday Whimsy Wednesday , Fall Into Fall , From Dream to Reality, The Inspiration Exchange, Live Laugh Rowe Live Laugh Linky, Thursdays Are Your Days, The Weekly Creative , The Creative Connection, Inspire Me Please, Catch as Catch Can, Fabulously Creative Friday, Party Junk, Pinworthy Projects , Link Party Palooza,, Weekend Bloggy Reading, Strut Your Stuff Saturday, Spotlight Saturday, Get Schooled Saturday, Overflowing With Creativity , , Suburbs Mama , That DIY Party


Love this!! I want to try for our Boys nursery!!
Hi,
I noticed you have lights hanging by the wall…
How did you get around the plug points?
Hello Kirsten, I see now that I didn’t add a picture of that step – sorry! We used a jigsaw to cut out the shape of the square for the plug outlet on the two pieces of plank that overlapped it. Hope that helps!
Love the plank walls…looking for the same idea for my sons room (7 year old). You should have posted a few more images of the room…hard to get a good feel with the images in the post. Thanks.
Hi Ed! You make a good point- this is the first project I posted in our boys’ room makeover so the room was very incomplete at the time. I didn’t have any images of the full room when I wrote it. And then I forgot to go back and add a full shot image…. thanks for the reminder! I added one now, of the full plank wall with the beds up against it. I still love this wall a year later, it’s a great project:) Take care,
Krista
I just love the plank wall and I am going to do this project in my basement! One question…did you fill in the vertical seams with polyfil like you did with the nail holes? If not, were the vertical seams visable? I’m struggling to decide how I will place all the planks based on where the vertical seams are going to end up. If the seams aren’t that visible, then I won’t worry about it too much, but if the seams are an eye sore then I will try to place them strategically and possibly even fill them with polyfil and sand them. I would love your wisdom and opinion on this! Thanks!! 🙂
Hi Maria! I didn’t fill in the vertical seams but I wasn’t too concerned if they showed a little bit. I find that once painted you really don’t notice them. At all. But if you really want a completely seamless look then I would just fill them with polyfil and sand before painting them. I think that would blend them in perfectly, especially once you get a couple of coats of paint on there. Good luck with your project!!
I love the plank wall! I have one question for you before I install one at my house. Did you paint the sides of the mdf planks? I’m just curious if it shows through like an existing color on the walls might. Thanks in advance!
Hi Megan! I didn’t paint the edges of the planks – I did paint the wall behind…but not the edges. I guess I thought that paint would seep through slightly when I painted the faces of the planks (once they were up) and that if there is any darkness showing between the strips of planking that it would add extra dimension. That being said, if you want to make sure it looks really white on the edges as well then it would probably be a good idea to paint them first. Good luck with your project!
Love a good plank wall! Looks fantastic. The room is so, so cute guys. Wonderful job!!
Thanks so much Shannon!! So thrilled you came by!
hi i’m not the greatest with computers but I just wanted to let you know how great all your ideas are and very simple instructions to follow. I look forward to your updates everyday. Continued success in all you do. Tina
This is great Krista! I loved that you used a penny for spacing, awesome idea!
Your wall turned out fantastic! I’ve wanted to do a plank wall for a long time, but have so many other projects. Maybe one day. Have a great week! ~Deborah
Love it, Krista! That’s awesome that your dad got to help out. You know they like to feel like they’re needed…at least that’s what I tell my dad lol. I got a nail gun for Christmas and I haven’t had a project to use it on yet…hmmm. plank wall? Maybe. 🙂
What a fun way to add a little bit of texture and fun to your boys’ room! This would also make a great wall for photographing pictures. Thanks for sharing on the weekend re-Treat link party!
Britni @ Play. Party. Pin.
I LOVE this!! You did such an amazing job!!!!
This is so awesome and I especially love the penny trick you used, genius!
Ooh I would love to do this to the back wall in our bedroom! Thanks for the helpful tips, Krista! Pinning!
~Abby =)
I love this so much Krista and I think it is perfect for a boys room! There is nothing like wood to add some real charm to any space! Have a lovely weekend! Angie xo
Oh, I love how that turned out! It gives the wall so much interest. I’ve got to remember the penny trick if I ever try a planked wall, great tip! And I love a nail gun! We have had one for years and if I have to hammer more than 5 nails, I whip that baby out. ha! 🙂
What a great project! I would love to do this in our boys room – I think everything looks better painted in white! 😉
I love plank walls!! Great tutorial, and I love how smooth the mdf is when painted!
Thanks Mindi- I love how it turned out! It is really smooth- we sanded the edges of the pieces as well to make sure they were smooth. I should add that to my tutorial- thanks for the reminder!! (and thanks for the visit – hope you are having a great week!)
So smart to use the pennies to space the boards! Love, love, love it.
Thanks Alexis- just an idea I borrowed from some of those wonderful tutorials I read! I love how it turned out too- thanks for popping in!
Would you share the total cost please?
Hi Kathleen! Sorry, I should have put that in the post and will try to add it later today. The three MDF sheets were $60 total ($20 each) plus they charged me $21 for all the cuts ($1 per cut) plus taxes. I had the primer already and I bought white paint that I used to paint the entire room with (so whatever the cost of paint that you choose). We also had access to the nail gun through my father-in-law and he gave us the nails but I think they are only a few dollars. If you live near larger hardware stores like Lowes or Home Depot they may cut your wood for less – I am not sure what they charge. And if you are in the US the MDF sheets are likely less expensive as well! Hope that helps.
Love this Krista! It fits your house perfect! I love the penny tip too, makes me want to cover everything in planks!
Thanks Mandy- it does suit the rest of the house I think. I would love to add some more of it somewhere…. the wheels are turning:) Thanks for coming by, friend!
Love the finished product! And it looks like a pretty straightforward project overall. Thanks for sharing!
Thanks Lindsey- it was pretty straightforward. Thanks for popping by!!
This looks fabulous Krista!
Thanks Leah- I am glad we went for it! Thank you for popping in:)
So gorgeous! You make it seem so easy, Krista!
And I love that you had the guys cut the boards for you. It’s making me consider a plank wall myself!
Haha Tara- the first guy I talked to about it at the hardware store basically tried to write me off when I told him how many cuts I wanted – but thankfully I was determined enough to seek out another kind hardworking soul who didn’t mind doing 21 cuts for me (lol). It was pretty easy as far as paneling projects go!
This turned out SO well!!! I love the way it looks. And the penny trick is pretty clever ;).
Thanks Amy- I borrowed that trick from some of the great tutorials I linked to- and I borrowed the pennies from my son!
Krista! It looks fabulous. And thanks for the great tutorial. I see a plank wall in my future 🙂
Thanks Tasha! I might see another plank wall in my future too:)
I can’t wait to try this, I’ve been pinning every tutorial I come across, trying to find the best for me way, I must tell you, I love the MDF!
Thanks Laurie! I love how it turned out and it was pretty easy – I linked to some of the great tutorials I found and read as well. It was helpful to read several!! Good luck with your project:)
Wow, looks great. We did a partial plank wall that we put hooks on in my parents’ laundry room & they love it…such a simple way to create some visual interest!
Hi Tash! That is a great idea- we did a similar thing in our laundry room but we used the tongue and groove planks in there. It was fun to try this different look with the MDF planks with the gap. Thanks so much for popping by!!
Love it!! I have been wanting to do one in my sons room. We already did one in our basement around our fireplace.
I love the idea of white walls too…except my son sees them and says “that needs colour, it’s so boring!” 😉
Lol – you could say white is boring but we have a lot of other color going on in the room so I would say it is more ‘calming’ then boring!!
I love it!! Too bad my 7 year old is waaaaay to opinionated!! LOL
What a great trick using the penny as a spacer! Nice work.I love a planked wall and yours looks great!
Thank you Meredith! I am thrilled with how it came out- nice to be able to read so many great tutorials ahead of time so that we knew what we were doing:) Thanks so much for stopping by!
It looks great. I love this look, but it seems like so much work!
I wonder if a cheat of painting really thin stripes on the wall to give the illusion of the break between the planks would work? Although trying to do that might wind up being just as much work as installing the planks!
Hi Susan! I wonder if that might work? It would be a lot of taping though- unless you are talented enough to freehand it. If the hardware store will cut the MDF down and if you have a saw to cut it at home, the whole process doesn’t take too long once you get going on it – though it is a bit more of a commitment then paint. Since we just used the small nails it won’t be too much to repair the walls if we remove it one day (not like glue…). Thanks for stopping by!
It looks fantastic! Love the extra layer and interest it adds to the room while still looking fresh!
Thanks Shauna- I agree – paneling always adds so much interest and is so bright and fresh in white. I am loving the white paint the most- think I may have to go white somewhere else around here:) Thanks for popping in!
Love it!!! Plank walls just look so good!
I agree Katie- I have been hankering after these for a while and am so glad I went for it! Thanks for popping by:)
Oh my goodness I am soooooo impressed!!! AWESOME!!
Thank you:) It really was a pretty easy project- much less finicky then some of the paneling that we have done. It really only took a couple of hours once we got going – and I am thrilled with how it came out. Thanks so much for your visit Kimberly!
Krista this looks great with the bed and makes it stand out. It also adds texture to the wall love it. I can’t wait to see what comes next.
Thanks so much Diana!! I am really excited to share all the projects we have been working on – it is starting to come together now! Hope you’re having a great week:)
Looks great! It adds depth and that something extra, to a room. 🙂 I have always wanted to give this a try. Maybe one day.
Hi Julie! I have been hankering to try it for a while and am so glad I went for it- my husband was skeptical but I think it I growing on him. I would actually love to try it somewhere around here too… Thanks for your visit!