
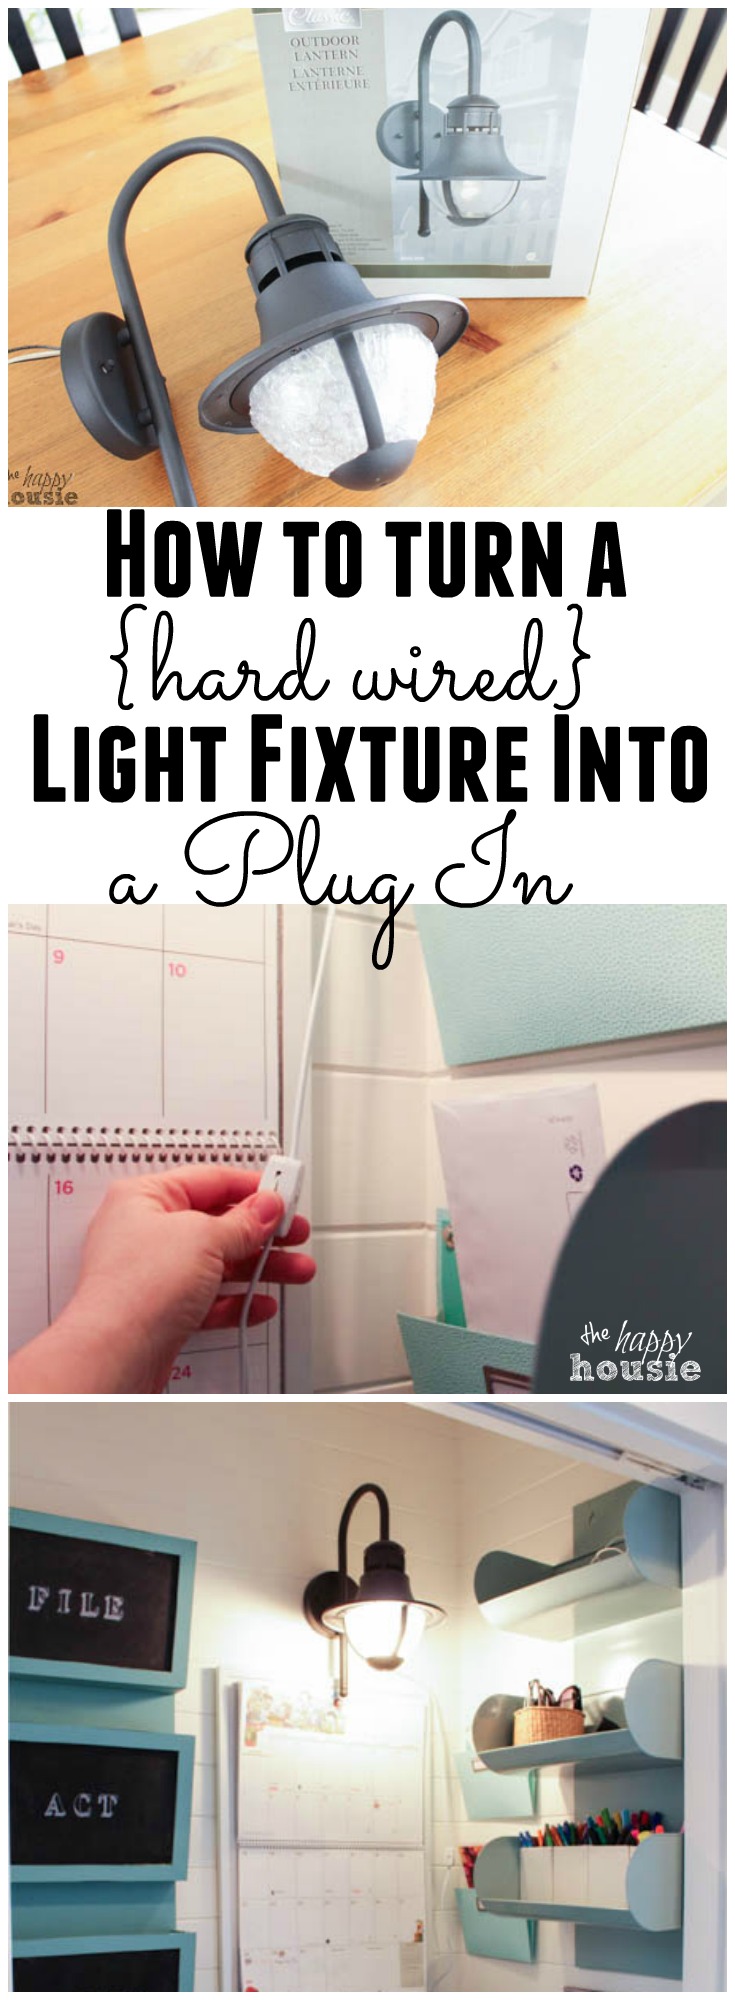
How to Turn a {hard wired} Light Fixture into a Plug In
Well, this morning is the official wake-up call for real life again.
After two amazing holiday weeks over the Christmas break, we will all be heading out the door back to school and work and I bet within the day we will barely remember this escape from our daily routine.
But routine isn’t all bad. In fact, I kind of enjoy routine and structure… as long as there is a little bit of room to be spontaneous every now and then.
And at least we are organized and ready for the routine (as well as the resulting onslaught of PAPER). Did you happen to catch my big Command Central Station {a Command Center in a Closet} reveal that I shared on Friday? Well, today’s project was made to add a little light to that space; and I am going to show you how to turn a hard wired light fixture into a plug in light!
Warning: I may be a woman of many skills and qualifications, but certified electrician is not one of them. I have basic wiring skills. This project is completely at your own risk. Be careful and consult a certified electrician if you are in doubt. We have used our light fixture for three years with no issues but, as I said, I am not liable for you taking on this project on your own.

Materials:
![]()
I started out with this Outdoor Lantern fixture that I picked up at my local Home Hardware (here is a similar item). I think I spent just under $30 for it?? I can’t quite remember, but I remember thinking it was a reasonable price and then being even more pleased when it was on sale once I got to the till. Don’t you love when that happens?!
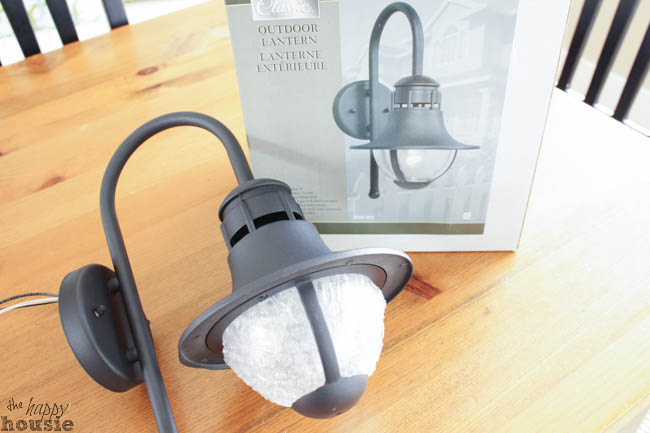
I also went to my local electrical supply shop and picked up a plug set (it has a plug on one end, with a little thingy in the middle to turn the light on and off, and then open wires at the other end). I have read other tutorials where they simple use an extension cord instead of purchasing the plug in wire piece like I did.
The metal plate I got is what will attach to the wall to keep the wires separate from the wall (as they are not buried in a box like most hard wired light fixtures would be. You will also need a screwdriver, twist on wire connectors (aka wire nuts or Marrettes), and electrical tape. You may also need wire cutters/wire stripper if you need to cut some of your wires shorter to suit your space.
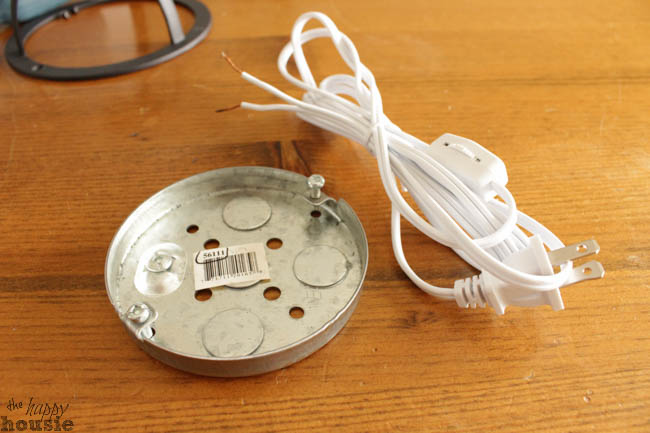
Supplies:
Step 1:
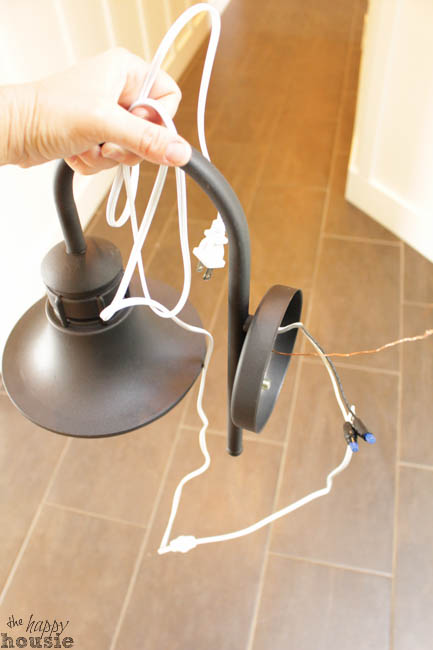
I opened up the outdoor lantern fixture and removed the metal brackets that you use to attach the light fixture up to the wall after you hard-wire it into the electrical box (in normal applications – obviously it will not be used that way in this application).
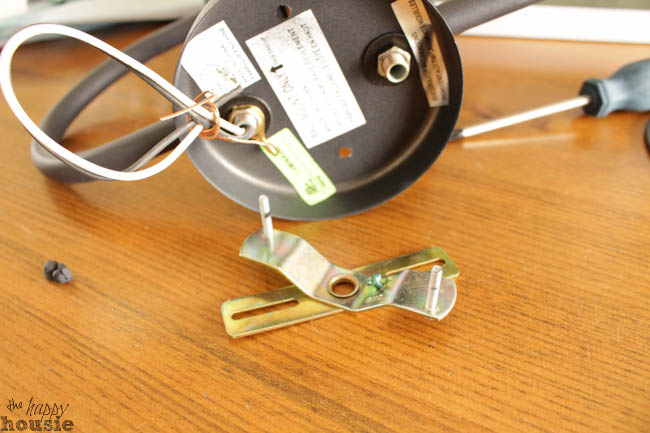
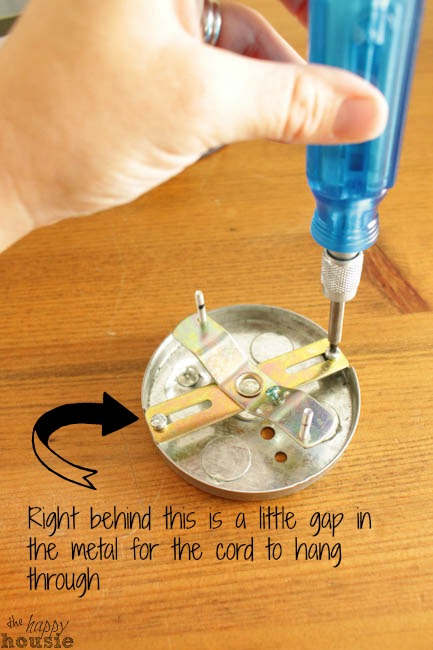
Step 2:
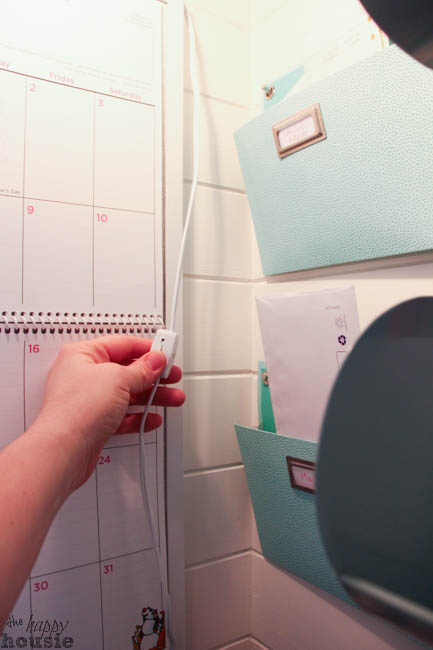
I attached the light fixture hardware to the metal plate that I bought to attach to the wall. On this plate there is a little gap where the cord for the plug can hang through once you have attached it all to the wall (so it won’t be wobbly).
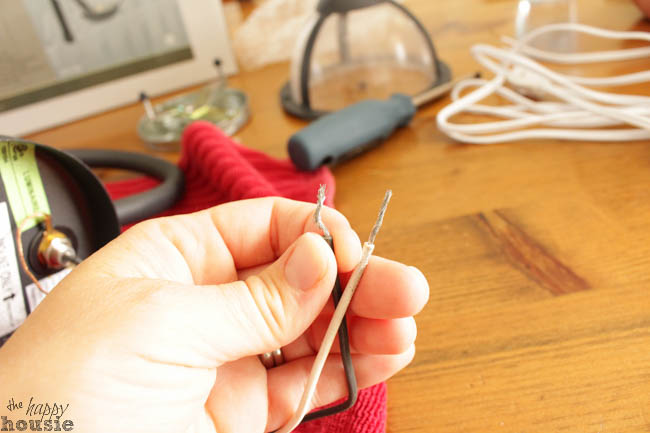
Step 3:
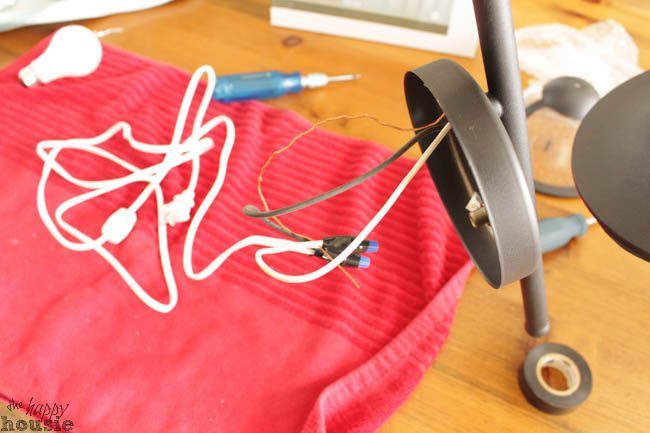
Your light fixture likely has three wires… two of these are what you will wire to the plug, and the third is a copper ground wire. Usually if you are wiring a regular fixture you match the black to black wires and white to white… but in this case my plug in came with two white wrapped wires so I didn’t have that colour guidance.
Hold the ends of the matching wires together so they are parallel and then twist them clockwise (using pliers if need be)…
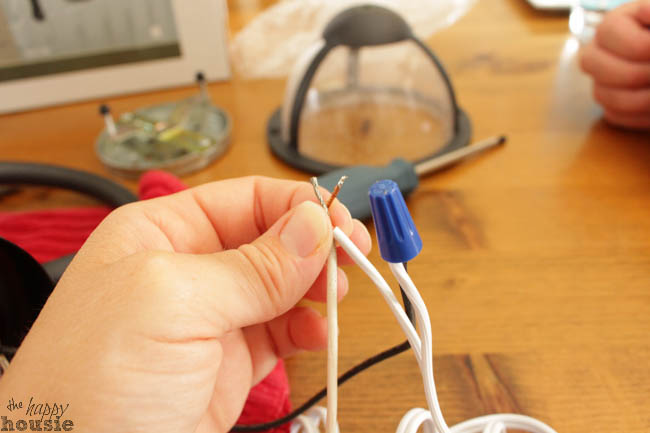
Step 4:
Then thread them into a twist-on wire connector (aka wire nut, or Marrette), making sure that all the exposed wire is covered by the Marrette.

Step 5:
Do the same with the other two matching wires.

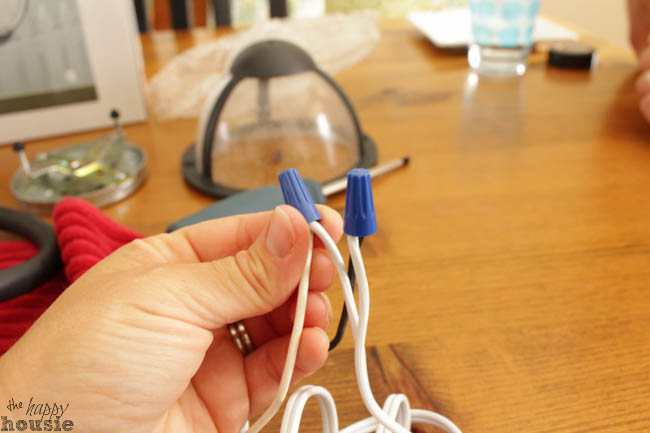
Step 6:
Place another twist-on connector, or marette over the two wrapped wires (again, making sure that no wire is exposed).
Step 7:
Wrap electrical tape around the marrette and wires to hold it all securely together.
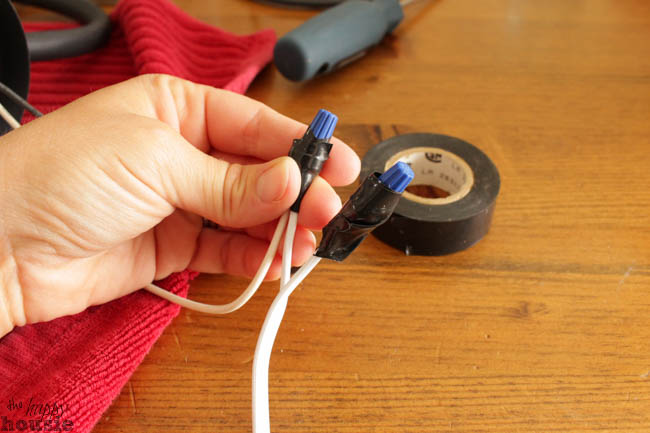
You can see the wires twister together and wrapped, as well as the copper ground wire in these pictures:
Step 8:
After deciding on the exact placement of where the light fixture should go, I attached the metal plate to the wall. You can see it still has the hanger brackets that I added from my outdoor lantern – I showed putting these two pieces together in Step 2.
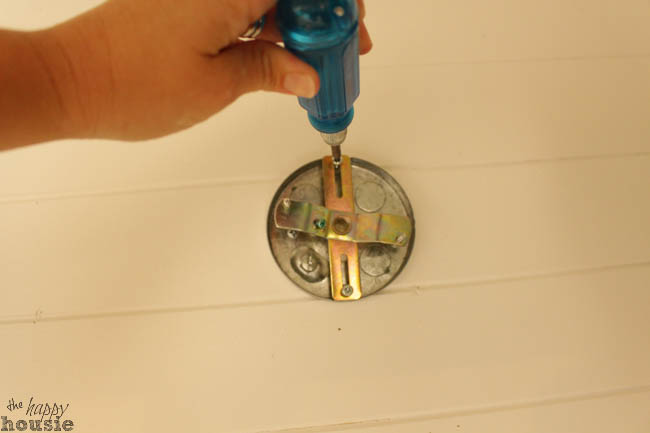
Step 9:
I hung the light fixture onto the brackets that I had attached to the wall, sliding the screws on the brackets through the openings in the face of the outdoor lantern’s plate. I then used the little nuts (aka the decorative bits that cover the ends of the screws) that came with the light fixture to secure it all in place.
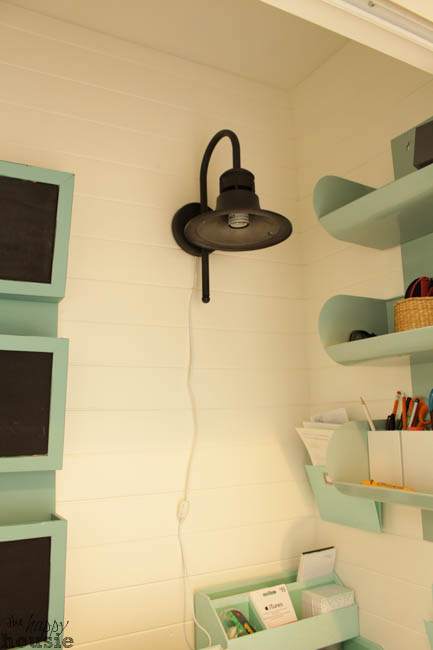
Done! Flick that puppy on and enjoy some light!
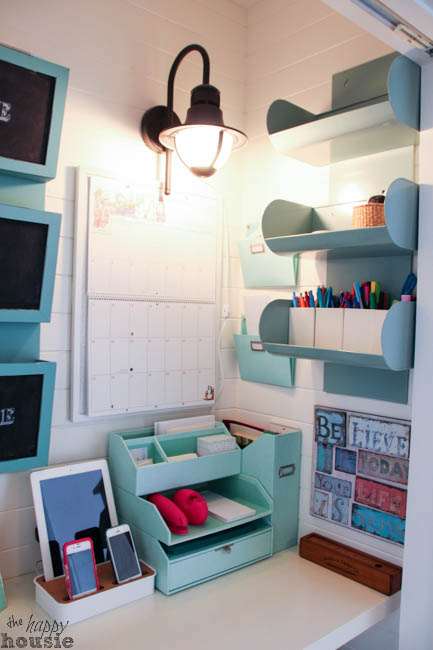
Since we have no overhead light in this little closet it is perfect for being able to see what we need to see during the dark mornings and evenings around here. 
If you didn’t get a chance to see the reveal of our Command Closet, or some of the other projects I have done for it…
Getting Organized with a Command Central Station

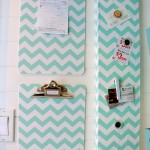
DIY Decorative Clipboards {using wrapping paper!}
Do you have a command center area in your house?
What tips do you have for making it a really functional space for your family?

![]()
![]()
![]()
![]()
![]()
![]()
![]()
Disclosure: This post contains affiliate links which means that if you click on them and buy, I will receive a small portion of the purchase. You will not be charged any more money then it would have cost you otherwise. It just means you are contributing a little bit to my housie budget. Cheer!


Hello. What do you do w the ground wire?
What do you do with the ground wire
It does matter how you connect the white parallel cord to the black and white wires. If reversed, one could be shocked/jolted by changing the bulb as you may have placed the hot connection to the side of the socket which in turn sends hot to the silver part of the bulb. The polarity must be correct so the hot is on the brass or copper tab at the bottom of the socket. To do this, look closely at the white wire (parallel cord) that goes to the outlet. There are two wires, one is smooth (and may have printed info on it) and the other has ribs or ridges along the side. The smooth side is the hot or black side and the ribbed is the neutral or white. Furthermore, by not connecting the ground wire and potentially reversing polarity you could be placing yourself or others in harms way. Take a look at your wiring and make the correction if necessary.
I have a question concerning the light you you wired for inside use. We live in a mobile that has an 8 X 12 add on, which I use for my computer area I only have a small lamp in there nowhere near enough light. So my question is can I wire track lighting the same way you wired your light, I sure don’t want to go through the wall to get to those wires
Thank you
You have done a few things that are not as safe as they should be. Yes the light will work, but some things are done a certain way to protect the user should something unforseen happen like a loose connection or the user touching the exposed metal edge when changing a light bulb. Depends on how safe you want to be and do you care, but remember you are putting this out there for alot of people to see so heres some background on the safety issues and why they exist.
Problem #1: Its dangerous to not connect the ground wire and here’s why: Its purpose is to prevent the metal housing of the fixture from becoming electrified should anything disconnect inside and touch the housing. If a person was to touch the electrified metal housing they could be suffer a shock or worse be electrocuted. When its connected, the ground wire would short out any unintended electrical path and pop the circuit breaker in your home. The solution is simple as others have stated use a 3 wire extension cord. Connect the ground wire on the extension cord with the fixture ground and your good to go.
Problem #2: Why black and white wires matter. The electrical cord is polarized. If you look at an outlet or extension cord end in your home, one side of the prong is larger than the other. One side is considered hot(small prong) and one side is considered nuetral(larger prong). Its intended that the hot side is connected to the middle of the bulb socket, so that if you touch the outside of the bulb, (the screw part) you wont get a shock. If you use a 3 wire extension cord and connect it matching colors and ground you will be all set. If you use a 2 wire extension cord a multimeter can be used to check when done that the smaller prong on the cord has continuity with the middle of the light socket connection.
Problem #3: Wire nuts are only to be used on solid wire. They dont work on stranded wire, the best approach is to use a soldering iron and tin each of the connections before applying the wire nut. Keep is mind that an improperly applied wire nuts can slip off possibly causing a loose wire and then you have a situation like problem #1.
Hello.
A very nice tutorial. The step by steps are easy to follow.
One tool that every homeowner should own when working with electricity is a multimeter.
There are low cost as well as high dollar multimeters.
The safety value outweighs the cost.
I am wanting to do this with motion detector light I have outside. The person who originally put it up wired it into an outside light fixture. He put a new fixture up that had a string to turn the light on and off. Problem is I can’t turn on porch light from inside. I have to go outside and pull the string. I want to hook up the motion detector light to an extension cord and plug it into a plug in. Will this work? Sounds basically like what you did. Then I will be able to turn the porch light on and off from inside and the motion detector light will work off the plug in.
Bad idea to do nothing with the ground. You should really buy a three wired plug set. The ground is there for a reason. Or at least wrap the ground wire around the screw that comes with the mounting bracket.
So I can just hook the ground wire to the screw on the mounting bracket and that work ok? If I were to buy a three wired plug set, wouldn’t the cord be larger in diameter? I don’t want a large diameter cord as I want to use a cord cover to hide the cord going to the outlet. Please let me know your thoughts?
Hello,
Im working on this so thank you so much for directions. I just ordered the same plugs for amazon, but I’m coming across on issue. How do I make sure the two white amazon wires match up to the correct black wire and white wire? If you could please let me know that would be amazing!
Hi Amanda – our plug-in had the same thing – both the wires on the plugin piece looked the same – so we determined that it didn’t matter which one we used for the black and white on the actual fixture. We just matched one with each as each of the wires on the plugin piece appeared to be exactly the same, and we haven’t had any issues.
However, as I said in the post, I’m not an electrician so you may want to visit your lighting store or hardware store and ask them for further clarification or check out some videos on Youtube if you aren’t comfortable with that! Good luck with your project!
Hello! I did everything and the plug works perfectly, but I Cannot find the wall mounting plate that you used- do you have a name for it? Wall mounting plate brings up too many options. Pan mount requires cutting a hole in the wall, so I would t want to do that! Thanks!
Hi Maggie! Do you have an electrical and lighting store nearby? I went in to my local electrical/lighting shop and they set me up with all the parts so unfortunately I don’t know a technical name for it other then wall mounting plate, but I think something like this might work:
https://www.amazon.com/Westinghouse-Lighting-0103600-Saf-T-Pan-2-Inch/dp/B000DCN8ZY
Good luck!
Krista, your a life-saver! I’m doing my ORC right now and just realiazed that the lighting I bought was hard-wired!!!!! I hope it works, since the reveal is this Thursday THank you!
Thank you. My project was easy with your help. My plug was white too, but found out that one side is ribbed (which is neutral or white) and the other smooth (hot or black)
What did you do with the copper ground wire? Great article otherwise. I’m a girl of all trades (master of none though) too so I’ve enjoyed finding another enlightened woman who knows she doesn’t need certain genitalia to be able to build, modify and make things. Lol.
What exactly is that plug in wire kit with the switch called? When I search plug in light kit, I don’t get anything with exposed wires on the end. Is it safe to say I can just cut it and expose the wires myself? The results in getting include the actual part that the light twists into.
Also, are there any decorative wire kits? Mine will be exposed so I want it to look nice.
Thanks in advance!
The only issue of concern I have is running the lamp cord through that gap. If it’s what I’m picturing the edges will be sharp, tight, and over time as the cord moves in normal use it may become cut to the point of exposing the wires and electrifying the fixture or starting a fire. I’d recommend buying (or salvaging from a dead appliance) a plastic snap on sleeve designed to protect the lamp cord from that, which may require enlarging the hole. Otherwise, with the other commentator’s note above about adding a knot to the cord inside the fixture base, neat idea and nicely explained.
If you were to take a drill bit and drill into the bottom edge of the plate, making a little semicircle for the cord to lay under, you wouldn’t have an issue with cord movement. Especially if like me you are running this thing along the ceiling or something to make a chandelier, you run it out the side at an inconspicuous angle and voila! chandelier you can switch on an off from your favorite chair!
You got everything right except one small detail. When you use a cord and both wires are “white” then one will have very small ribs running up and down the length of cord. The ribbed wire should be connected to the white wire on your fixture. It’s not dangerous to have them reversed but this way is standard practice. FYI I’ve been a licensed electrician for 19 years.
Thank you. This is exactly what I was wondering.
Awesome to have advice from a tradie. Thank you for posting this comment. I do love to know how to do things correctly so I don’t have to worry 🙂
Jay, should the ground wire be connected to something?
great description. by tomorrow night, it’ll be done. thank you.
but what do you do with the ground wire that was shown in one of the photos, i have a chandelier,and want to do the same thing,but it has a ground wire and i don’t know what to do with that,I don’t want to attach it to a wall, I want to hang it from the ceiling using a large hook,like the hanging lamp I had back in the day
Great idea! I was just in Lowes the other day asking if they had a plug in light for my daughter’s room. Now I can make one on my own. Yay!
Yay! It is such a great little trick, right? Good luck with your project!
Is this up to code? I’m looking to do something similar for my mom’s place with a wall-mounted light. If the light is screwed into the wall, is it not a permanent or semi-permanent installation? Temporary installation, I know, needs to be able to be taken completely down, but is not subject to the strict requirements that ordinary home electrical wiring needs to follow. Correct me if I’m wrong, but if the fixture is screwed to the wall, you need to run the cable into the wall to comply with safety regulations?
Hello,
I think it is important for you to check exactly what the code is in your particular area. In the materials picture, you can see a small metal plate that I bought at a local electric store – that is so that I can hang the light fixture against the wall and provides a break between the wiring and the wall. I explained what I was doing to the electrician there and this is the piece he gave me so as to follow safety requirements in our area. Good luck with your project!!
Very nice tutorial and I love your choice of lamps. Just two things I would add. (1) Don’t twist the wires prior to inserting them into the wire nuts. Just stick them straight into the wire nut and then twist the wire nut. This holds it all solidly together and is how the wire nut is designed to work. If you twist first it can tend to come apart. (2) Make a knot in your cord so if someone accidentally pulls the cord it can’t pull apart the connection. There is a special knot for this called an “Underwriter’s Knot”. Hard to describe, but there are lots of pictures on the internet.
Thanks for the tips Anna, I will look into those ideas!
Hi Krista, this is so useful. I have always wanted to know how to do this! I always thought it was complicated but I feel much more comfortable after reading your tutorial. Thank you!
Hi Juliana, It is quite easy- especially if you have ever wired new light fixtures into your ceiling before, as the process is much the same. And how great is it to be able to put a light fixture up where no wiring exists?!
So what do you do with the copper ground wire? And are the wires hanging down between the base of the fixture and the wall? Does that make it wobbly?
Hi Judy,
The copper ground wire was just twirled up into a neat circle and left inside the fixture- it wasn’t needed (as you know, lamps often are only two-wire and don’t have a ground wire either, and essentially you are turning a fixture into a wall mounted lamp). The metal plate that I bought from my local electric supplier (shown in the tutorial) had a small gap in the metal – a spot for the cord to go down through. Because of that gap in the metal plate, the light fixture is attached tightly to the wall plate. There is no loose gap so it is not wobbly at all. Hope that helps!
Krista
Great tutorial! I plan on doing something similar with a hardwired light fixture that I have and this is exactly the direction I was looking for in how to execute that project. I googled high and low looking for a plate similar to what you show since I feel like that is key to mounting and hiding the cord in the little gap of the plate that you mentioned. Alas, I found it is actually called a “pan box”. For anyone else that has had trouble finding something similar a pan box is what you are looking for!
Thank you!! I will add that to the post!
Happy New Year. Love this and think I might need it down the road even though electrical work scares me.
Hi Julia,
It scared me too, but it was actually really easy! Thanks for popping by!
I just discovered you the other day. Love your home and decor. Thanks for this light info Krista. I’m going to try this myself. Pinned! I’m glad to see that you’re an “Island” girl…me too, I’m from Nanaimo. Keep up the great blog.
Thank you so much Lynde! How great to ‘meet’ an island girl! I love Nanaimo – it is my main shopping destination! I guess it is probably best that Home Sense and Target are an hour drive away:) Thanks for your visit and kind comments!!
Krista – you’re a genius. I love this! Pinned!
Bwahaha, yes, genius. Thanks Tara!
Fantastic idea!!!Pinned!