
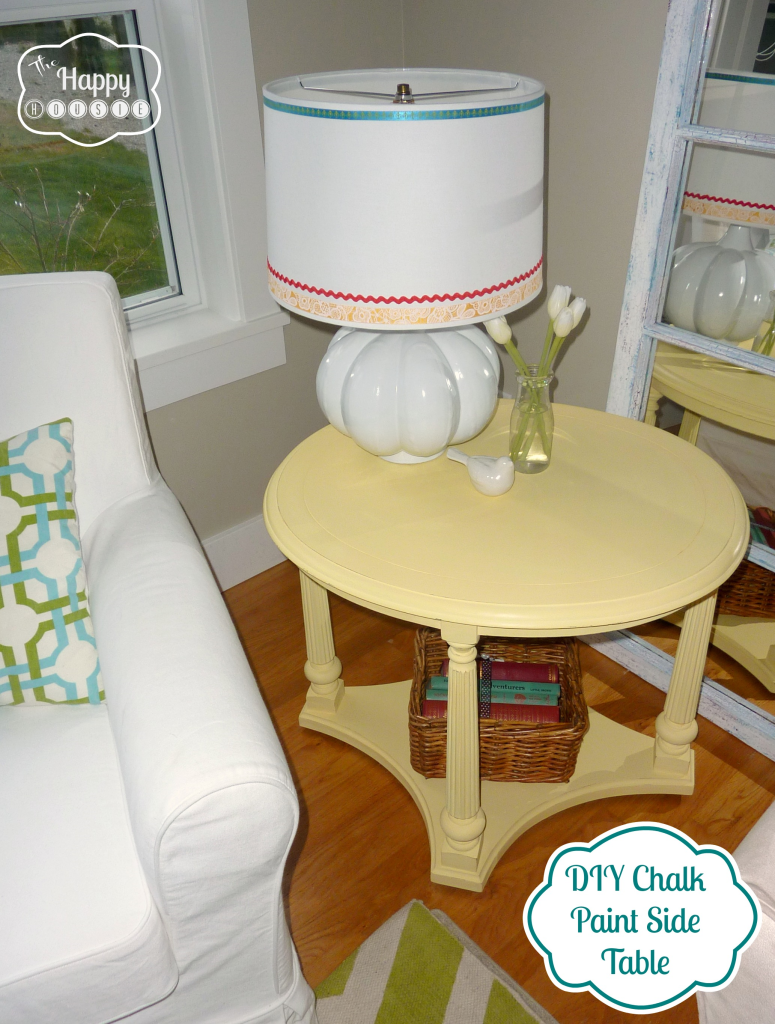
Mellow Yellow: DIY Chalk Paint Side Table
This adorable mellow yellow chalk paint side table was easy to make with this tutorial.
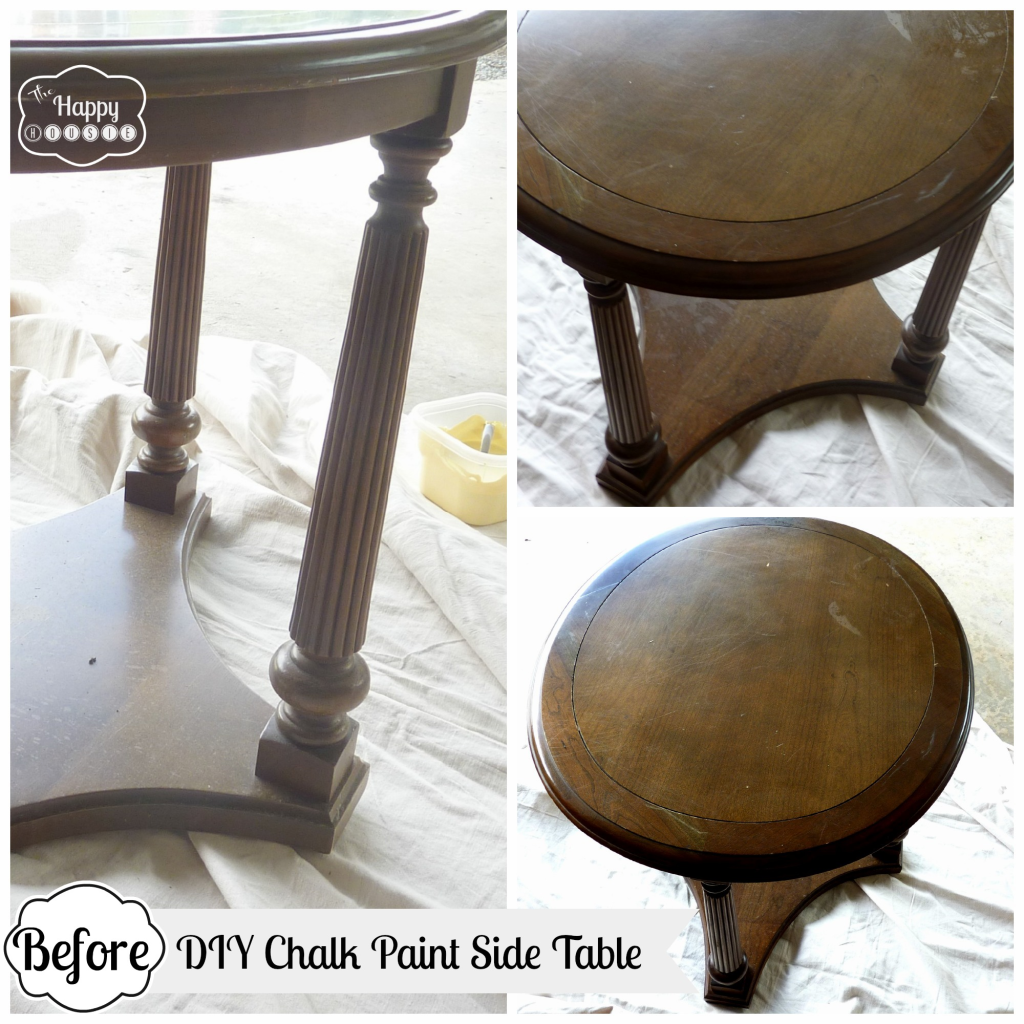
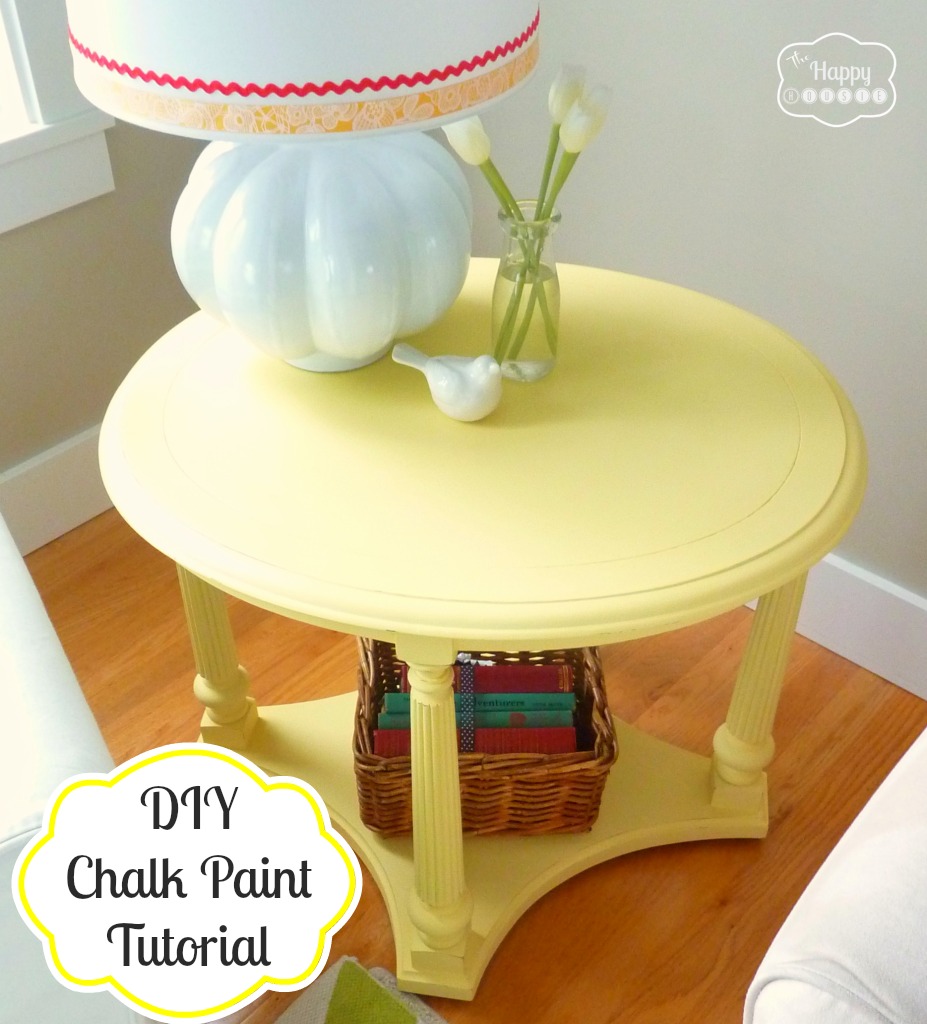
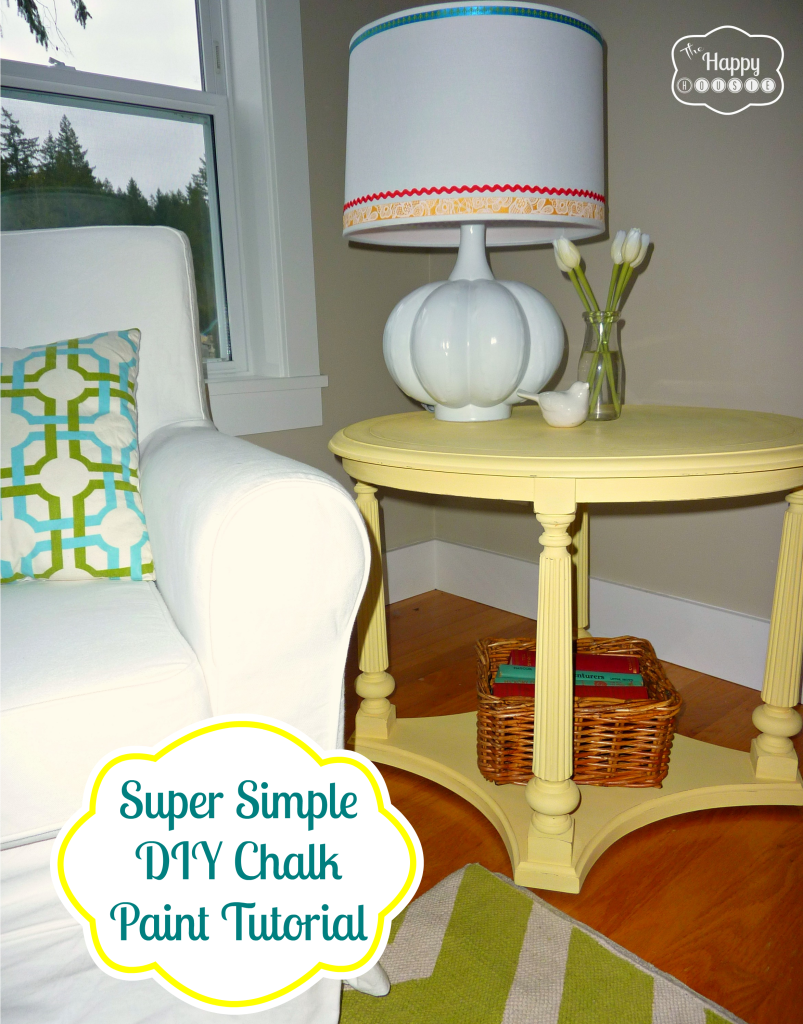
With spring comes the need to lighten and brighten things up around the house… so the living room is undergoing some springy colour transformations right now. Lots of things in the works, one of which was painting a side table that I picked up at a second hand shop. It had interesting lines that I thought would look great painted in a fun bold colour, like the Mellow Yellow (by Benjamin Moore) that I had bought but didn’t use for the laundry room revamp.
It’s a pretty simple process with DIY Chalk Paint. No need to sand first, just give your furniture piece a good cleaning with a cloth and water (and perhaps some soap if it is dirty).
Then mix up your chalk paint.
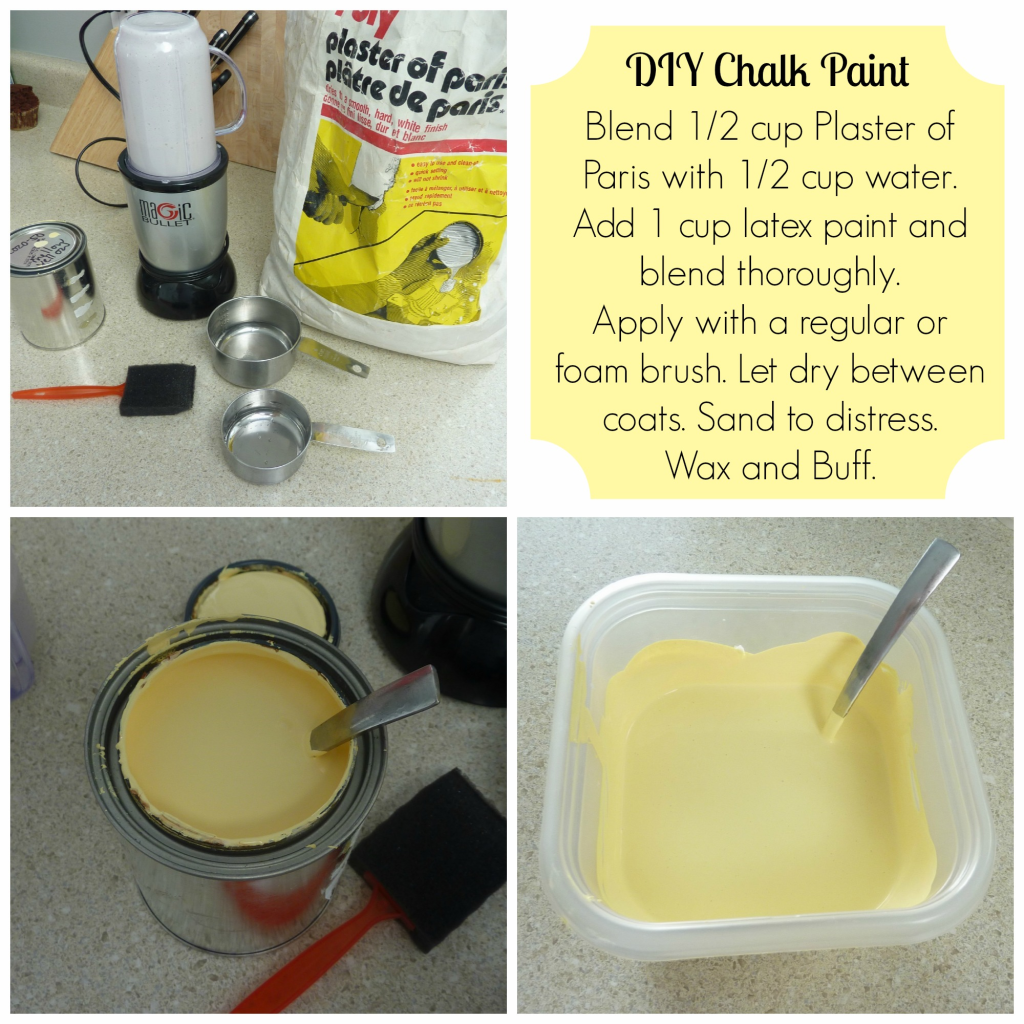
I used a mini blender to mix my plaster of paris and water before adding the paint, only because my plaster is old and I am too cheap thrifty to buy new stuff. New plaster of paris would likely mix well with warm water just by hand…
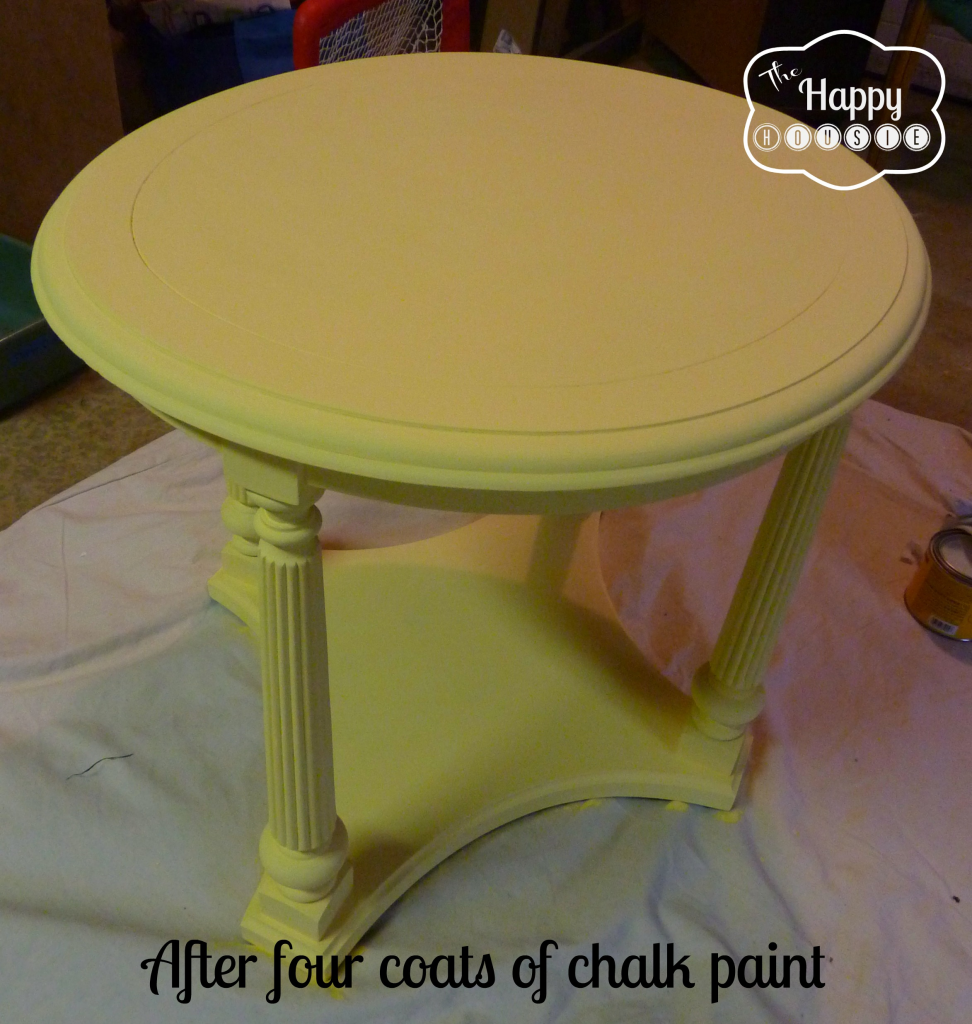
Then get painting! I used a foam brush for this DIY project… I ended up doing FOUR coats of this rich yellow to get the right colour and coverage over such a dark wood table.
NOTE: I have since done several projects using this recipe and a regular brush… the good thing about sanding your project after you finish is that it gets rid of any brush strokes (or at least it seems to have to my eye….). So you don’t have to use a foam brush to paint with this DIY Chalk paint.
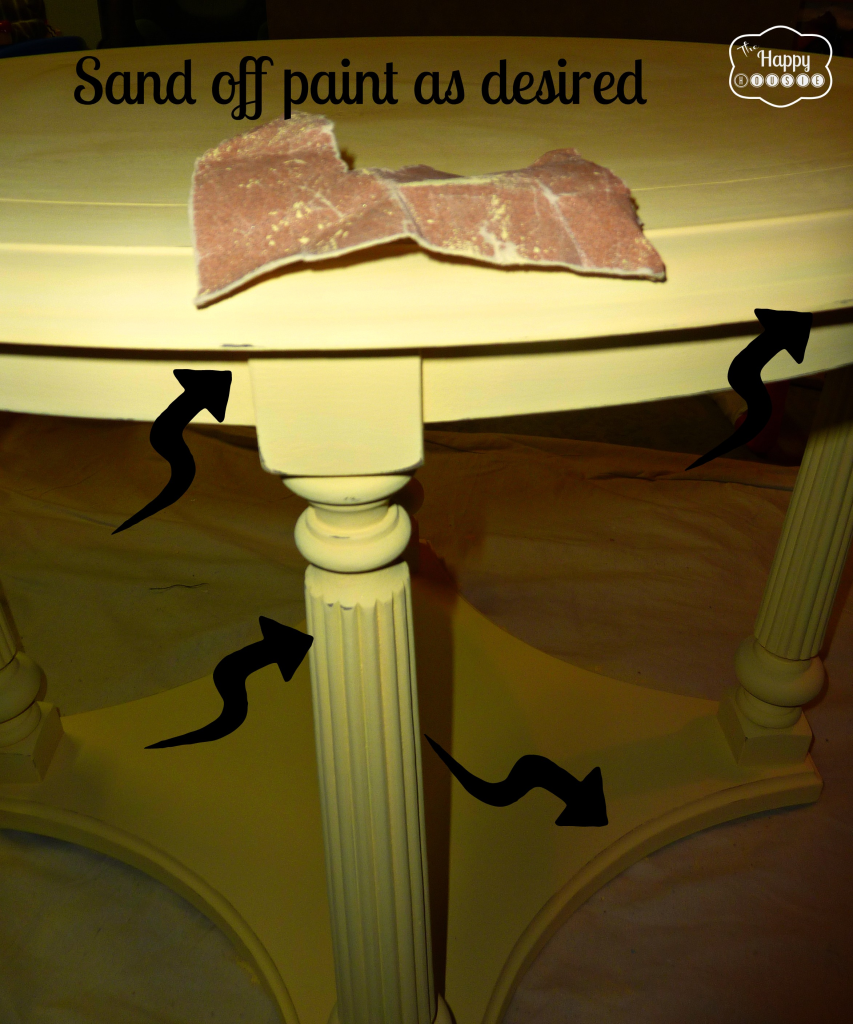
Now you are ready to sand OFF some of the paint, if you want an aged textured look. I sanded with 150 grit paper around the edges and top as well as along the legs. Don’t mind my pathetically overused looking sandpaper.
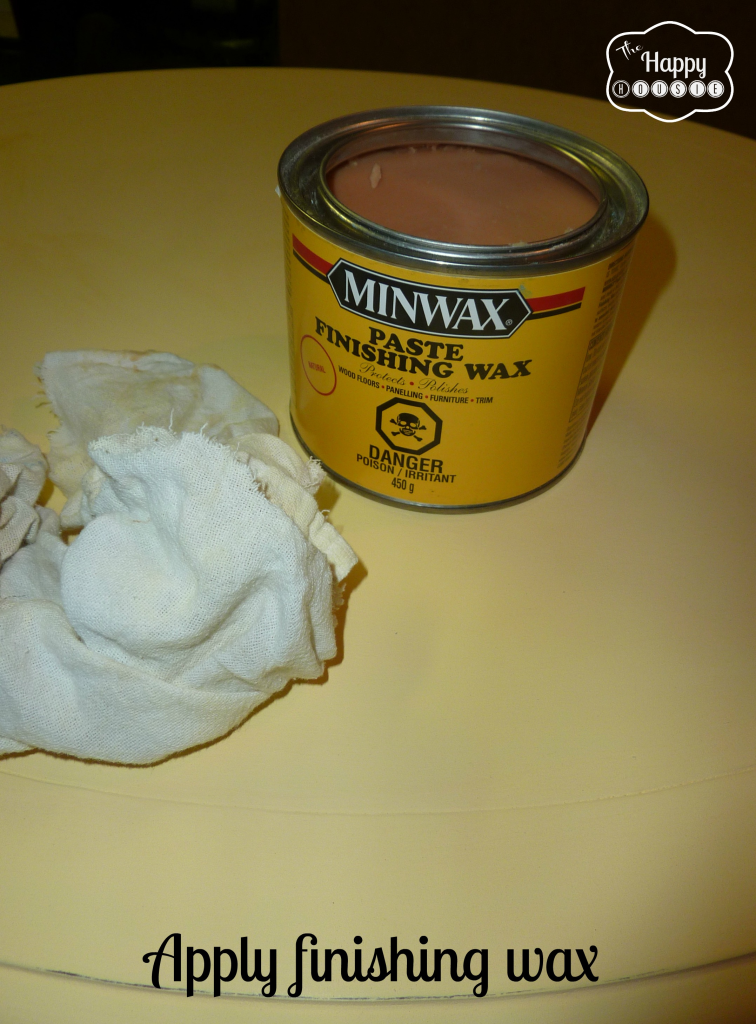
Then WAX it baby!! I used Miniwax Finishing Paste because it was cheap and available. Seems to work fine and provides a nice protective sheen. I scooped mine out of the can with a spoon and then applied it with a soft rag… after applying go over it again and buff it off with a slightly cleaner soft rag. Make sure to use a clean lint-free cloth so that you don’t get any lint or junk caught in your wax top coat!!
Done! Let the wax dry a little and then move your piece into your room.
DIY Chalk Paint is a fun, quick, easy project that you can complete in a day or less because the DIY Chalk Paint dries so quickly! You can recoat every half hour until done!
Have you done any springy changes at your house? Painted any furniture lately? Used DIY Chalk Paint? What was your experience with it? I would love to hear from you!

This project was featured on:


Linking up to some of my favourite Housie Parties
such as Give Me the Goods Monday and Home Stories A to Z Tutes and Tips


Very nice little table and color too. I have been using this same recipe for chalk paint and love it. After painting 10 or 12 pieces projects, I too had the plaster begin to harden in the bottom of the container. I had read that using really warm water was a good idea so I did that, although it was probably hot. I had not had a problem before using the hot water. I mix my paint in a Solo cup. When I stop to take a break or go to bed, I place the cup and wet brush in a large ziplock bag and it stays nice for several days. After several experimental pieces, I have two exceptionally nice dressers that I painted and am very happy how they turned out. I am finishing up a 9 drawer dresser today and it will be my favorite. Above, I see other postings that mention posting a photo but the photo does not show up on my screen. How does that work ?
Hi Karen! Do you mean posting a photo of your piece? Send me your photo by email! I would love to check out your work:) krista@thehappyhousie.com
ok Krista I will do that 🙂
I’m a little late to the DIY chalk paint party, but I’m ready to give it a try! Does mixing the plaster of paris and water mixture lighten the color of the paint at all? I’m wondering if I should go a shade darker. Thanks for your tutorial!
Wow! What a unique and beautiful coat you have created. I’d love to implement this style in my kids’ bedrooms… it really pops!
i really love this table! 🙂
I used your reciepe and my thrift store find turned out pretty good. Thanks
Very very glad to hear it worked out well for you Kim! It is different, working with chalk paint – and sometimes takes a little getting used to:)
Krista – What’s not to love about this wonderful mellow yellow faux-finish! Wonderful transformation and it looks great in the room. Great project (and great color choice!)
Thank you so much!!
hi krista!! your table looks awesome! we are getting ready to paint our kitchen table. will this chalk board paint be durable enough for a kitchen table as well? it seems like a much cheaper route to go this way. also, i noticed you didn’t prime it. we are going from a dark wood to an antique white. would you suggest priming for that?
Hi Susan!
With the wax finish over top I find the chalk paint to be quite durable. My in-laws recently painted their kitchen table, sanded and primed it and used a special oil based metal/wood paint from Benjamin Moore and they have had problems with chipping. So even though I used to recommend oil paint for furniture… I think that the chalk paint works very well as long as you give it the protective top coat.
You could sand/scuff it up a little if it is a really shiny finish on your table. In all my chalk painting I haven’t sanded or primed – the only thing I had problems with chipping was the melamine cupboard doors and I had to go back and prime that first – but melamine is a plastic finish.
I think it should adhere to your wood fine without priming, but of course you will probably need an extra coat in order to get the coverage you want going dark over light.
If you feel the wax isn’t strong enough to protect on a kitchen table you can always use chalk paint (I am assuming you want to do so to distress it a little and sand off some of the chalk paint after… am I right??). Anyhow, you could always top coat with a polycrylic (like a varathane protective coat). I am planning to chalk paint my kitchen cabinets (one of these days) and I plan to varathane over it in order to get extra endurance and washability on my cabinets. So that might be a good idea for a kitchen table with high use as well.
Good luck, let me know how it goes… and if you have other questions you can also email me at krista@thehappyhousie.com
Krista
Why is it called chalk paint? Is it also a blackboard?
I think it is called chalk paint because it is made after Annie Sloan’s chalk paint with has a chalky texture due to the ingredients it is made with… the DIY stuff is not quite the same as the original and the recipe I use is made with plaster of paris. I seal my projects after with wax, but have also used it without waxing it and it IS indeed a chalkboard surface. I did a chalkboard surface in my pantry and on our back laundry room door – both of these projects you can read about on my blog if you are wanting to make your own chalkboard paint (in whatever colour you want!!).
I love the table. I also love the color you chose. A great tutorial, I just bought some Annie Sloan chalk paint, but will have to try this diy version which is probably easier on the pocketbook!!
Thank you Shawna! I have yet to try the ‘real stuff’ but plan to do so one day… don’t have very easy access to it where I live and DIY is certainly cheaper. I am super interested to see how they compare though:) Good luck with your projects!!
Lovely…mellow yellow is a perfect description, and it’s looks great next to your couch. Nice job.
Thank you Gail! So glad you came to visit!
I love that you make your own chalk paint! This makes complete sense, although I never realized you could…my coworker is all on board the chalk paint express but I didn’t care for the pricetag of the name brand chalk paint…I’m going to have to try this out! Thanks so much for the tutorial!!! 🙂
No problem Kari! I hope you give it a go…I have found it to be very successful and have loved it! I have some new tutorials on it coming soon:) Thanks for your visit!
Krista, I know Happy is in the name, but seriously everything you do is so happy! I love it! Since I accidentally left the lid off a can of expensive chalk paint, I am so *happy* to find this tutorial!! Thank you.
Hi Jackie! I am so glad you found this recipe too… and so thrilled you came by to visit! I am a huge fan of your amazing blog and fabulous style!! Good luck with your chalk painting:)
What a lovely, cheery table. I’ve been wanting to try a chalk paint project and your tutorial has given me the courage I need. I’d love if you’d come and share at Inspire Us Thursday at Organized 31. http://organized31.blogspot.com/2013/06/inspire-us-thursday-link-party-4.html
Hello! I just finished first piece and the prjoect was going great until I applied the wax. Some lint was left behind from the old tshirt rag that I used. I used a very dark grey paint so that may be why is it more obvious, do you have any idea on how to eliminate this lint from the piece?
Thank you
Hi Val!!
Sorry to hear about your difficulties!! I think you probably need to lightly sand it until you remove the lint that is stuck in the wax and then rewax it with a fresh clean cloth – I will add a note to the post about making sure to use a cloth that is lint-free so that no-one else has to experience your troubles!! Hope it works out well:)
Krista
I love your style, I adore working on solid wood furniture, yet they are difficult to come by at decent price. I have found walnut one recently, which was an old telephone table with nice bottom shelf. I have upholstered the shelf with piece of faux black leather, and the whole table has been sanded down (which revealed amazing wear & tear marks). For the top I have decided to go with the native american theme, and sketched the Bull Skull silhouette, which I have later filled with black oil based paint.
Sounds really amazing!! I love fixing up old stuff too!
I believe it was the Valspar paint. I went to Home Depot this morning and purchased a quart of their version of the same color with a Behr base. I mixed it up as I’d done with the Valspar, but this time it worked as it should. yeah. two pieces complete. thanks.
So glad to hear it worked!!
Hi Krista!
First, I really wanna thank you a lot for this chalk paint post, im definetely gonna try it too as soon as I manage to get calcium carbonate powder. It’s quite difficult for me to follow all the DIY recipes since i live in Prague where it’s nearly impossible to get the specifit products frequently mentioned on blogs – however I have no intention to give up. My question is simple, is it possible to make the DIY chalk paint out of water-based paints? Or does it have to be synthetic – coz those smell literary toxic and its very unpleasant to work with it in a little apartment. Moreover i got a beautiful shade of turquoise blue paint recently – but its water based one so im not sure if i can use it.
Thanks for your advice! Helen
Hi Helen,
I have never made it with oil paint – only water based latex paint (like the regular water based paint that you use on your walls). And I used plaster of paris – just labelled as that rather than generic calcium carbonate powder. Hope that helps, good luck!!
Krista
Hi! I’ve looked all over for chalk paint and can’t find it so I thought I’d try this DIY. My question is, can this also be used on fake wood like real chalk paint? I have a real wood dresser I plan on painting & another piece that isn’t real. Will this work? Thank!
Hi Taquilla – I have used it on melamine cupboards and found I needed to prime them first. But they are especially shiny so that paint just scratched off. I have used it on a lot of shiny wood surfaces (i.e. that have varathane on them) without priming and it worked. You could try painting your wood piece first and testing the paint on your non-wood piece and then try to scratch it off a day or two later – remember it is supposed to sand off and will come off a little before being waxed but it should actually scratch right off once it has had time to cure. If it does scratch off of your non-wood piece then I would suggest you prime it first. Good luck!
Krista
Hi Krista. Can you tell me why you use the wax instead of poly? Does it give it a better finish? Also, do you still use your Magic Bullet for food after you mix your chalkboard paint or do you have a different one for crafts?
Thanks,
Nicole
Hi Nicole,
When people use the Annie Sloan Chalk Paint they generally finish it off with her wax… I read some DIY chalk paint tutorials and they were finishing it off with wax as well… so I just followed along with that. It gives the furniture a protective finish (like poly wood) but is less glossy and new looking – sort of goes along with the distressed vintage effect that most people are trying to achieve when they use chalk paint. You could definitely do a poly finish if you were worried about durability… but the wax does a pretty amazing job I have found.
LOL- the blender. I actually do use my flat blade for mixing it and then I clean it thoroughly – but I don’t really use that blade ever for food. But I do use the cups again – a good thorough clean and they are good as new. I think you could probably skip the blender step but my plaster is a little old so I want to make sure it dissolves thoroughly.
Krista
I tried your chalk paint recipe but within minutes of painting, it started turning into the consistency of plaster or Moon Sand that our kids play with. I followed your recipe but can’t figure out what went wrong? The only thing I can think of was that the paint was old…. It was like painting with wet globs of sand, literally. Please help……
Oh no! Sorry to hear about your troubles!! I have made chalk paint and painted using this recipe at least ten times and I have friends who have used it and have never heard of that problem before! You used plaster of paris? And the plaster was reasonably new (not old and damp… if it had been exposed to dampness it would change the plaster). Was it latex and not oil paint? If so it must be the paint… I know that if paint is quite old it definitely changes consistency of it and it becomes quite thick and globby… I guess the best you can do is scrape it all off, sand off any that is dry or sand it smooth and then try again with new paint and plaster. Hope it works out for you, I know how frustrating project mishaps are!!
Krista
Perhaps the water temperature was too hot? It should be warm only otherwise the plaster will set quickly. Also when my paint gets thick I add a little water (teaspoonish).
Hope that helps.
Julie
That could definitely factor in Julie! I did use water that was a bit to warm once and it mixed up into a mousse-like texture – still dissolved nicely in the paint though. Good thought:)
Krista
I mixed it all very well by hand. Could that be it? If I use just a teaspoon of plaster of p, it stills does it.
Hi Wally – I did ask you if you got new paint and you said you tried it with new paint… also, do you mix your plaster with warm (not hot) water until it is smooth and then blend the plaster/water mixture into the paint. What happens if you do that, then paint it on and then let it dry… does it stick and dry on properly – don’t try to scratch it off immediately, let it dry and cure a bit… Then you sand and distress it and then wax to protect it…
Krista
Did you ever figure out the problem. I tried yesterday and it worked perfectly. Then, I started a new piece today and the same thing happened to me as Wally Czyz. Just curious if a solution was ever found as I’ve gone through 2 pints of paint now. Weird that the same paint and same bag of grout would behave differently in a matter of 24 hours. Hmm.
Hello Mely,
That is so strange. Was the paint left overnight? Maybe your plaster dried out a little?? I have made this recipe at least ten time and have even left the paint for weeks at a time and gone back to it – just given it a good stir and used it… it is always slightly rough and never totally smooth like paint without plaster added. You say you used grout? I have never tried it with grout. I only have ever made one recipe size at a time – so 1 cup of paint with 1/2 cup plaster and 1/2 cup water blended first then added to the paint…. just like in the tutorial. Maybe making it up in a larger batch would mean it didn’t mix as thoroughly? I don’t really know what else to tell you! Sorry to hear of your troubles:)
Krista
I mix the pp and water together in a plastic container then measure out my paint in a measuring cup, pour paint into a different plastic container and stir the liquid plaster into the paint and stir by hand. I use latex flat but am going to try semi gloss next. So far I haven’t had trouble with the paint. You may need to start again from scratch with all fresh products.
Julie
Great description Julie – that is pretty much what I do too, but I blend my plaster and water in my blender because my plaster is a little old and needs the blender to get it smooth. Guess I could just go and buy some new stuff:)
Hi Krista
I started painting a dresser and have 4 drawer fronts done… 2 coats of paint, a little distressing and a coat of wax which I haven’t buffed yet *just applied this am*….I am NOT happy with the paint job. The brush strokes show thru big time! I used a bristle brush. How should I fix this?
Any help would be appreciated
Thank you….
Julie
Hi Julie!!
I am so sorry to hear of your troubles!! I have often used foam brushes for my chalk painting because it doesn’t leave any brush strokes, but with my media console I did use a bristle brush and once I lightly sanded the whole piece you could not see any brush strokes.
I would try using a fine grit sandpaper over the whole drawer front on each of your drawers… then go over it with one more coat of chalk paint using a foam brush. Once dry do a light sand all over the whole front and distress the edges as desired. Then wax/buff.
With the diy chalk paint you should be able to sand the brush strokes smooth, you may not even need the additional coat once you sand over the whole surface lightly with a high grit paper… just depends how it looks after sanding.
Good luck, I sure hope it works for you!!
Krista
That happened to me on my very first piece. I learned to not paint at night (poor eyesight). Even after I waxed it, I went back over it with some sandpaper (in the daylight), a little paint…light sanding…and waxed again and you can’t even see that I touched it up. On my 2nd piece I knew more what to expect…and I lightly sanded some of the brush strokes before I waxed. All is not lost…except for a little wax =o)
Hi Deborah!! I think the light sanding is the key!! Losing a little wax (and time:) isn’t the end of the world as long as your piece turns out well!!
Krista
Krista,
Thanks so much for the tutorial. You’re table is beautiful. I’ve been researching different recipes for chalk paint and yours seems to use the most water. Most of the others say just add a tiny bit at a time until it’s smooth but not watery. I’ve also read from other blogs that if you use too much water, the paint will not adhere well. Have you had any problems with it chipping off. I just put the first coat on and it does scrape off easily with my fingernail. Does this get better with each coat, or will the poly / wax seal it in so it won’t scratch off?
Thanks so much for your help,
Mary
Hi Mary!
I do a few coats and then distress it… I use this recipe when I want to be able to sand my paint off… but once it is dry and sealed with wax I have not had any problems with additional paint chipping off my furniture… I have seen recipes that require less water as well. I found my recipe on pinterest and have been happy with it, but that doesn’t mean that it is the best one out there! Best of luck, hope it works out for you:)
Krista
Thanks Krista! I so appreciate your super fast reply:) I’ve done 2 coats, 2 coats to go and I’m really loving the consistency and ease of this paint recipe. I too am distressing the furniture, hoping it looks as awesome as yours!
Hi Mary!!
So glad it is working for you… I tested my furniture after your question/comment last night and I must say that I can’t scrape my paint off at all… once it cures/dries and is waxed it seems to have a really great protected surface. I found that this recipe went on really smoothly too. Would love to see a picture of your piece when you are done!
Krista
Featuring you tomorrow! You are awesome! Thanks so much for linking!
Bisous
Thanks Isabelle!
Krista
Hello again!
Your makeover stuck in my head so much that I just had to feature it in my blog series, Get Your Color On: Yellows. My series highlights DIY projects from other bloggers, decorating tips, and decor picks.
Thanks again for sharing your creativity and feel free to post a Get Your Color On! button!
Angela Conley
Creative Blossoming
http://creativeblossoming.com/2013/05/19/get-your-color-on-yellows/
Thanks Angela! I am glad you liked it enough to feature:)
Krista
I died laughing when I saw how you blended the paint. You’d think they thought of everything when they did their “Bullet” infomercial–till you came along ha ha. So cute, soooooooooo funny. BTW, love your piece…I love the creamy butter colors, it’s nostalgic of a lot of the 20s – 40s homes I tour…just beautiful (and thanks for giving me a giggle).
Hi Deborah! I totally realize the absolute ridiculousness of it… glad you got a kick out of it! Sometimes ‘housie’ extends to crazy at little, hey? I love the connection to that time period… glad it has a little vintage feel:) So great to meet you and thanks for your funny comments:)
Krista
hey!
I picked up that dresser I texted you, so I came over to your blog for a tutorial of how to get it painted a la Krista! Can I borrow your blender?
xM
Lol! Absolutely!!
Krista
Krista, this is so cool! The table itself is amazing, but then to learn you made your own chalkpaint?! I try to pride myself on shopping on a budget, but I definitely splurge on my ASCP… but I think you’ve inspired me to try this. My wallet (and husband) will definitely be happier. It’s beautiful!
Hi Kristen! I don’t have a source for ASCP or I might have tried it… though I do love to use up old paint by turning it into chalk paint. And you can do a huge piece of furniture for hardly any money this way. I have a new piece about to be unveiled and it only cost me about $5 in paint. Hope to see you again!
Krista
I hope you will be revealing the entire room soon because I would love to see everything together. Did I spy a green chevron rug?
Hi PJ! I am working on finishing some things up today so I will have some more to show soon… Yes that is a green chevron rug!
Krista
Really cute table – I love the lines and the color is so fun!
Also – I love your blog design. So fresh and pretty!
Thank you Julia! I love the table too. The blog design is a work in progress and has been a huge learning curve for me, but thanks for your kind comments!!
Krista
Looks amazing! I was just looking around for a good chalk paint recipe too 🙂 Thanks so much for sharing with us at Weekend Wonders! Hope you’re enjoying your week so far!
Thanks Jessie! I hope this recipe works out for you! I can’t wait to see what you paint:)
Krista
You make this look so easy Krista! Love the color too 🙂 Pinned!
Thanks Trish, it really was quite easy. I am just about finished chalk painting another piece in that colour… Thanks for your visit!!
Krista
I need to try some DIY chalk paint. What a great way to use up some paint and much cheaper!
Hi Lisa! Yes, definitely the perfect way to use up paint leftovers – great savings:) Thanks for your visit and your comments!
Krista
Thanks so much for linking to Make the Scene Monday @ Alderberry Hill. You are being featured later today!
I hope you enjoy your weekend, and join me Sunday evening for Make the Scene Monday #71!
And don’t forget to enter the Cannon Rebel T3 Camera Giveaway!
http://www.alderberryhill.com/a-pre-summer-cannon-rebel-giveaway/
Oh!! I am so excited Sarah! Yay!! I have to hop over right away and signup for the giveaway though. I would love a new camera:) I will share the giveaway on google+ too. Thanks again for the feature!!
Krista
I love, love, love your table. The color is fantastic! Such a pretty color of yellow. I also like all your tips for decorating and keeping on a budget in the other post you linked up. Thanks so much for linking up at the Real Family Fun link party! Hope to see you next week.
KC
Thank you KC, I am in love with the table colour now too… I think I need to paint some more things yellow around here. I feel a little snowball effect coming on. Thank you for taking the time to visit me, I know how crazy it must be to personally visit all your links! I will definitely be back next week. Have a fabulous weekend, and thank you again so much for the feature this week!!
Krista
I love this table! The color is just the perfect shade of yellow! 🙂 Would you consider sharing this and any other recipes you may have over at my party?
http://www.thetaylor-house.com/2013/04/17/pinterest-power-party-features-6.html
Have a great evening!
Chrissy
Hi Chrissy,
Thanks so much for the invite! I will head over there right now:)
Krista
What a fabulous table!!! I love it when side-tables have a shelf underneath to store or display items… 🙂
Yellow is such a cheerful color for it…
hugs x
Crystelle
Crystelle Boutique
Hi Crystelle,
The little shelf is a fun… I just have to figure out the perfect item to display there. Thanks so much for your visit and your kind comments!
Krista
It’s the perfect color for spring—well, any time of year really. It’s so cheery! I also love the table. You scored a great find; it’s so unique! Thanks for sharing!
Thanks Angela, I think the table was a good score… I drove by it (as it sat outside the thrift store) a few times before I finally stopped and made it mine. Glad I took the plunge, I love how it turned out painted. Thank you for your visit!!
Krista
That is a very nice shade of yellow! Your table turned out lovely.
Saw you sharing at Whimsy Wednesdays
Debbie 🙂
Thank you Debbie, the colour really turned out as well as I could have hoped for… yellow can be tricky! Thank you for your visit today!!
Krista
This turned it really cute. The color is so fresh…I haven’t tried DIY chalk paint, but I need to. It can be so expensive to buy! Great job 🙂
XO,
Christy
Hi Christy,
I started using DIY Chalk Paint because we don’t have a local source for it… and also because I am cheap and wanted to use up some leftover paint. It has worked out really well! I am so thrilled that you came by today!
Krista
It’s so gorgeous! thanks for the info on chalk paint to
Thank you Mel, I hope you find the info useful! And thanks for coming by today!
Krista
I love the design of that little table….and it turned out great! The color is perfect. Thanks so much for sharing it at the Project Inspire{d} party 🙂
Hope you are having a fabulous week !
Nancy
Thanks Nancy, I am pretty in love with my new little yellow table too…feel inspired now to bring a little more yellow in with some other furniture. Thanks so much for coming by to comment:)
Krista
Love how your yellow table turned out. I am going to try your chalk board paint recipe.
I am following you via G+ and BlogLovin.
Have a wonderful week,
Bev
Thank you so much Bev! I am thrilled to have you following:)
Krista
Gorgeous!
Thank you Danielle!
That color is just perfect! Thanks for sharing it at Monday Funday!
Thank you Katie,
I am loving the colour too… am now planning to paint a few more things yellow around here:)
Krista
I love the color, the table turned out great!
Thank you Megan, and thanks so much for coming by!!
Krista
I love your yellow color! So pretty, this is a beautiful piece! Visiting from Dream to Reality. rita@pinkpolkadotcreations.
Thank you Rita! I really appreciate your visit:)
Krista
So cool! I love the way chalk paint looks but haven’t been able to find a local source. Thank for for this tutorial!
Hi Natashalh,
It is really easy to make your own, plus you can use leftover paint! Thanks for your visit,
Krista
Super cute & I love that yellow!!!
Thanks for visiting me today – I love finding BC bloggers!!!
Hi Anne,
Thanks for returning the visit!
Krista
What a cute table! Life to the full! Melissa
Thanks Melissa!
I have never used chalk paint, but I want to. You make it look so easy and your table is beautiful!
Danni,
It really is VERY easy! I think it is pretty fool proof, which I need because I am not exactly the tidiest painter. Something about always being in a hurry to get things done… Thanks for coming by!
Krista
What a fabulous tutorial Krista!! Your table is beautiful, I would love for you to share this at the Pretty Things party (live now) !!
xo, Tanya
http://twelveoeight.blogspot.com/2013/04/pretty-things-16-link-party-and.html
Hi Tanya,
Thank you so much for the invite! I will head right over:)
Krista
What a beautiful piece! Love the new color.
I’m visiting you today from Give Me The Goods. I hope you get a chance to stop by my blog and leave a comment, too!
~ Megin of VMG206
How To: Post a Link in Comments
Hi Megin,
Thanks so much for coming by! I appreciate your kind comments. I will definitely go check out your blog:)
Krista
This looks so pretty in yellow!
Thank you Steph!
I have plans to do another table in yellow really soon, maybe with a stenciled top this time. I appreciate your visit!!
Krista
looks pretty Krista! Can’t believe the paint is DIY!!!!
It is Vel! Well, the chalk part of it anyhow, the paint part is Benj Moore.
Krista
Gorgeous! Love the color! Jenna @ Rain on a Tin Roof
Thanks so much Jenna! I am in total love with this colour now too… I plan to paint my other side table with the rest of my paint. I see a lot more yellow coming into my life really soon! Thanks so much for coming by!!
Krista
Looks great! I always end up clicking on your projects at link parties–you are always doing awesome things! Question…how does homemade chalk paint compare to Annie Sloan? Is one better than the other? What are the difference? I just ordered my first gallon of ASCP and am anxious to try it, but if making your own works just as well, I might have to go that route! I popped over from Alderberry Hill–thanks for sharing!
~Abby =)
Hi Abby! Thrilled to have you visit again!
I have only used my homemade chalk paint so I can’t give you an honest assessment of how it compares to ASCP. But before I began my chalk painting binge, I did a lot of research. Diane, over at In My Own Style, tested three different types of chalk paint: ASCP, homemade with grout, and homemade with plaster of paris, and didn’t find much difference. Check it out at
Good luck! I am excited to see your projects!!
Krista
How pretty! I love the bright cheerful yellow color you chose, it’s so pretty!
Thanks Maria,
It does really add a cheerful fresh feeling to our living room – perfect for spring:) thank you for your visit and kind comments!
Krista
What a pretty color of yellow! Your table turned out nicely. Thanks for sharing the chalk paint recipe!
Thank you Elise! I am very happy to share it, good luck with any projects you try it on! Thanks for coming by!
Krista
I really like it, it turned out great 🙂 The color is bright and cheerful; perfect for spring! I just started making some changes too around the house but it’s still snowing here! Hope you will have a great weekend!
Thanks Ingrid! Snow in April! We usually get a last little bit of snow in March but we have had a warmish spring so far… Looking forward to more great weather come May. Thanks so much for coming by to comment and have a great weekend yourself:)
Krista
This looks great! You picked a lovely color.
Thank you Betsy, and thanks for coming by!
Krista
Love it, Krista! Thanks for the recipe for DIY chalk paint. I’m pinning this right now. I have a couple of projects that could use a little chalk paint love!
Thanks Tara, I have a garage full that need some chalk paint love right now… Just need some more time!!
Krista
Thank you for linking up to The CSI Project. I think you did a great job and the colour is so nice and fresh!
Thank you Trine. I really appreciate your visit!
Krista
I’ve never used chalk paint, but you’re the second person I know to blog about it this week, which means maybe I should try it! I love the way the table turned out.
I’ve been revamping everything from Mason jars, to diy string lights to making a pair of large cabinet doors into a coffee table. I’m turning into a DIY junkie!
Sounds like a ton of great projects Andrea. I will hop over and check it out!
Krista
I’m towards the end of redecorating my family room in aquas, reds & a splash of yellow so I LOVE your table! I have an old drop-leaf table that we use as a tv stand and I painted it. As soon as we finish I will have pictures posted on my blog.
Hi Leslie! Thanks for coming by… I love those colours, I will drop over and check out your space:)
Krista
that turned out really cute!!!!
Thanks Ann Marie! Have a great weekend.
Krista