
Organizing 911: How to Give Your Pantry a Little Sweet Lovin
Create an organized pantry with these helpful tips!
Remember last week when I showed you my newly made over drawer? Well soon after I tacked Enemy #2 (The “Tupperware” Drawer) and discovered that the problem was mainly an overabundance of lids. I am not sure how lids manage to multiply themselves inside of a sealed drawer, but somehow we had ended up with approximately three lids per one storage container. So after some very quick organizing and recycling, I was ready to move on.kitchen
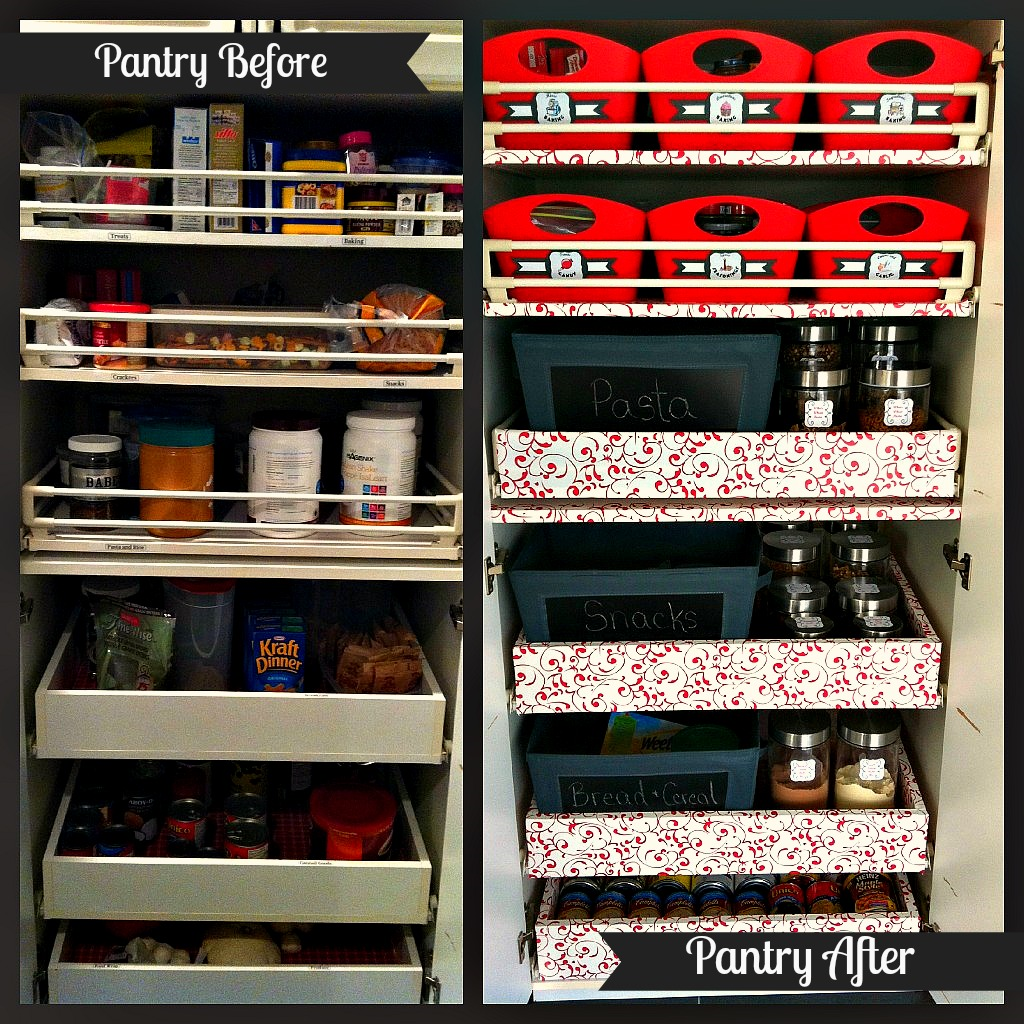
The IHeart Organizing blog that I talked about last week was featuring a February Kitchen Challenge and I was feeling crazy-inspired by the beautiful pantries that she wrote about (hers, as well as the pantries of other readers. You can read about it here. My pantry, on the other hand, looked more like this:
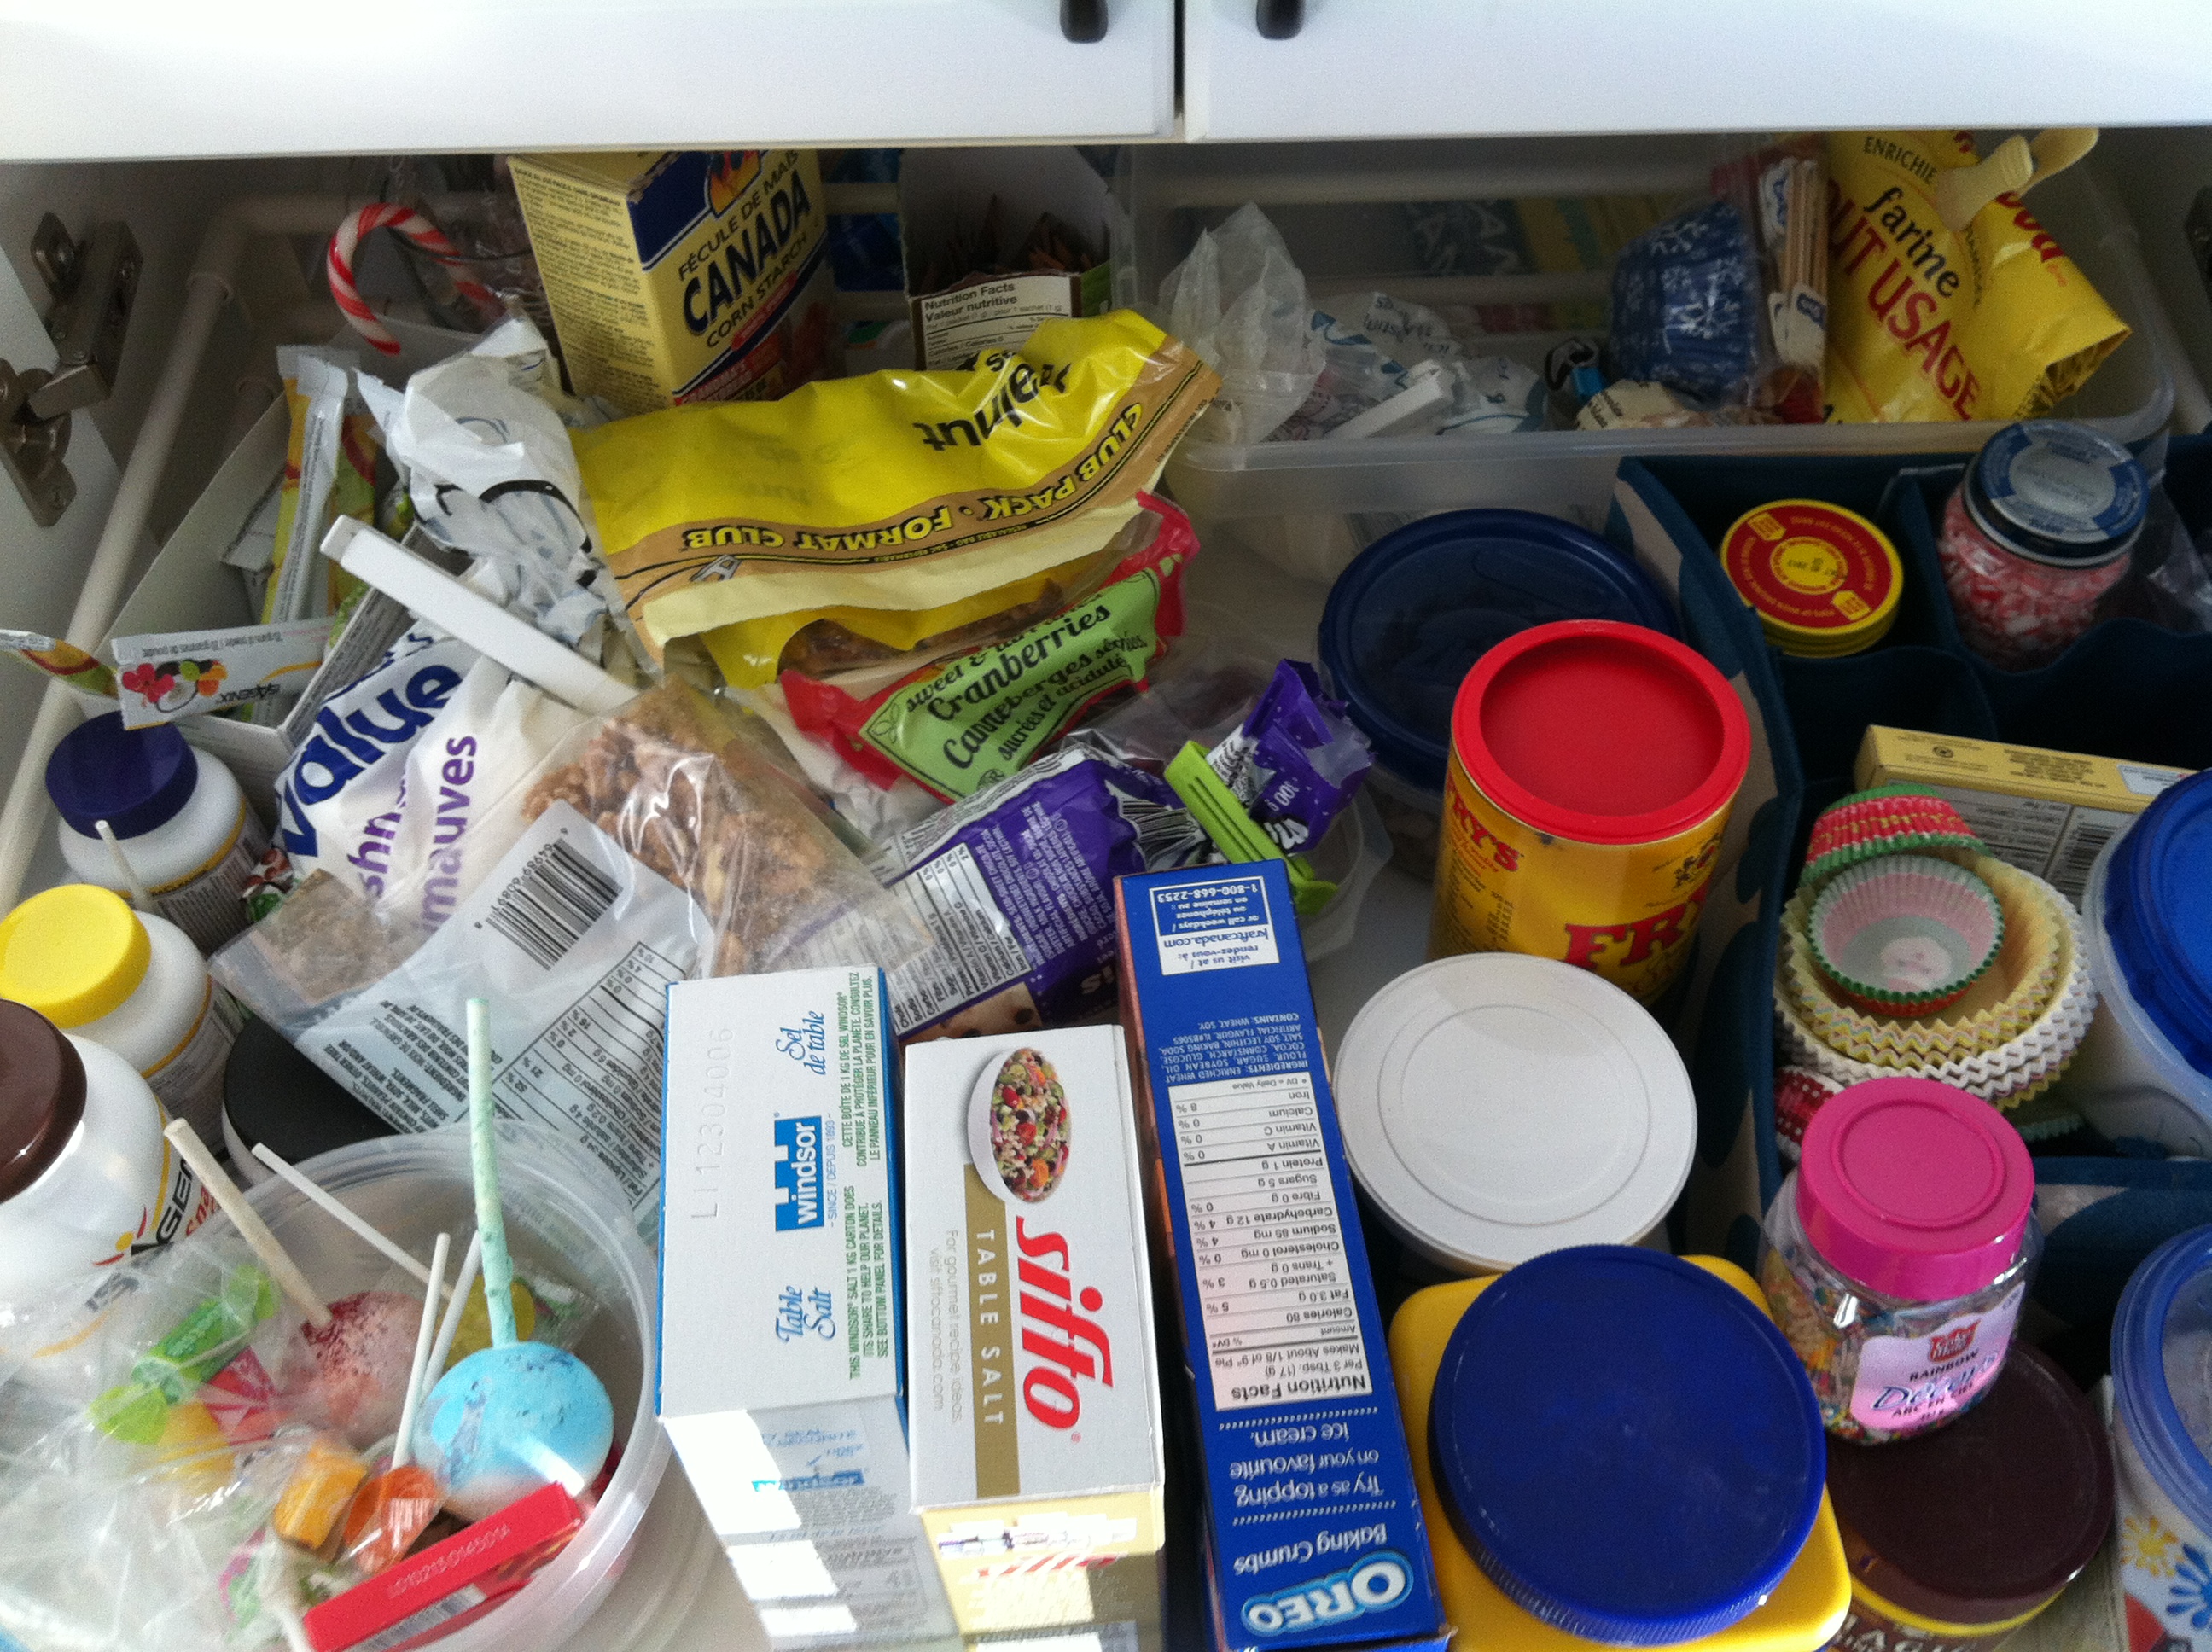
The pantry had become a serious hazard; food was being lost into some kind of great abyss never to surface again. So I decided to take my inspiration and tackle this pantry monster head on. Here are some more views of what I started with:

You can see that there was an incredible amount of wasted space, some semi-rotting squash leftover from my fall display bowl (I even grew those white ones myself!) and a random mixture of foods on each shelf with no real sense of order to it at all. I knew it had become ‘bad’ when I starting just throwing food in the general direction of the pantry after I got home from grocery shopping just hoping it would make some kind of smooth landing. Time for a serious intervention.
To begin, I took everything out of the pantry, assessed what type of foods we had that needed to be stored there, and came up with a plan for how to group foods together. This was done after grocery shopping so that I had a better idea of what kind of storage we REALLY needed (don’t assess this when your pantry is depleted!).
Organizing The Pantry
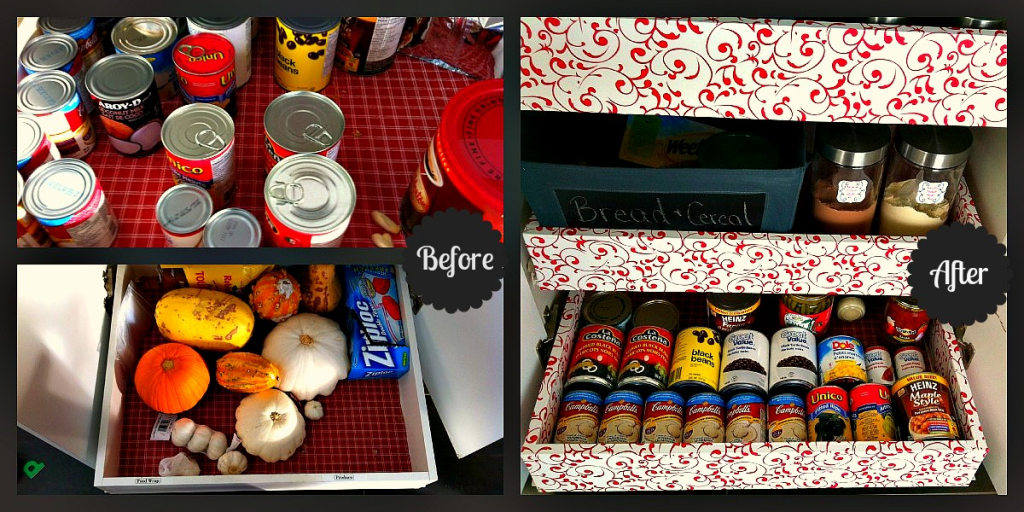
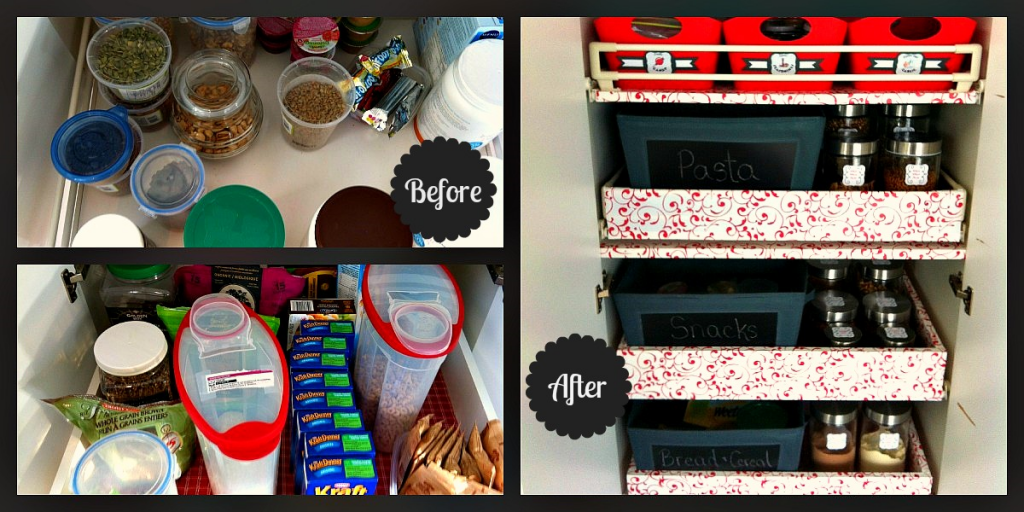
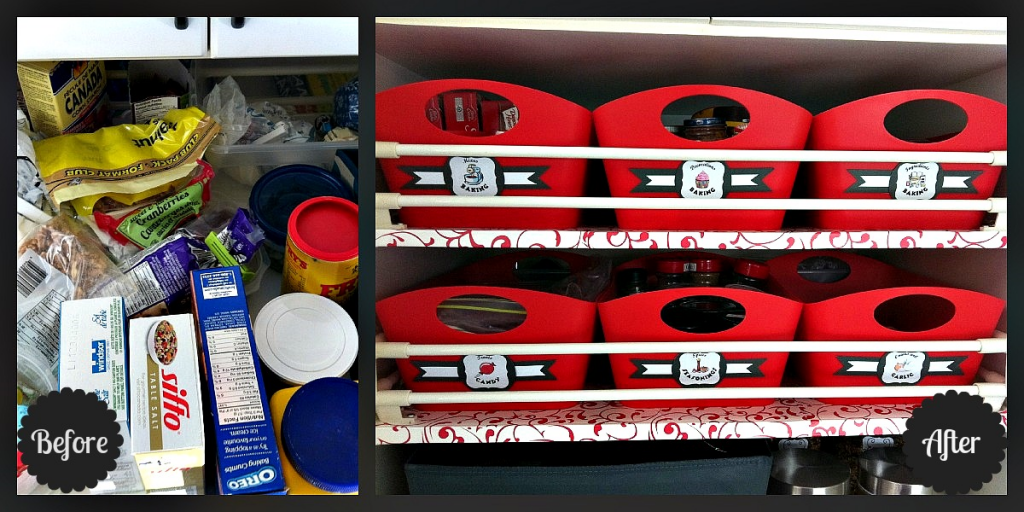
I decided that tin cans should go face up on the bottom drawer so that I could always see the label (instead of getting down on my hands and knees to find the can I need). I also decided to group baking items in bins on the top shelf since we rarely bake. Snacks for the kids were to be placed on the second drawer up since they could be easily accessed there by the little people. And the main staples could take up the three middle shelves. I measured my drawers (width, depth, and height) and set out to my local dollar store to find some cute and affordable organizing solutions that would fit perfectly into each of the drawers. Enter:
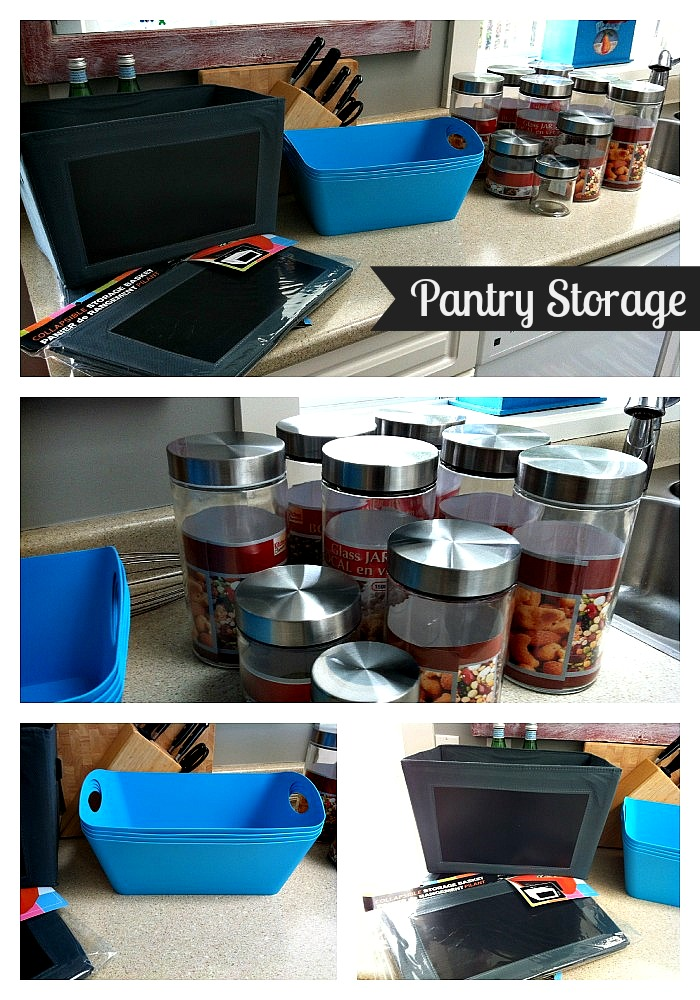
You will notice in my final pics that I decided to trade these blue bins for the same bin in red. The red worked better with the overall colour scheme of the pantry (by the way there is nothing ridiculous in saying that my pantry has a colour scheme). The next step was to clean the inside thoroughly and install some pretty contact paper that I had picked up at Walmart (on clearance, yay!) in order to pretty it up a little. The pantry cabinet, while functional, is over 18 years old so that good’ol melamine finish was showing a little wear.
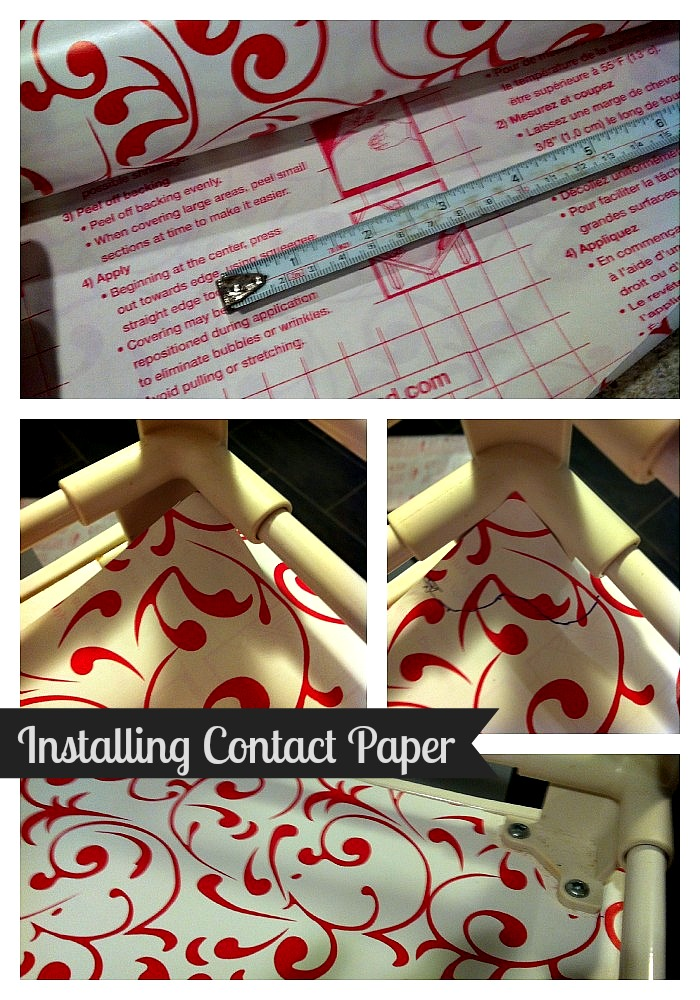
The contact paper installation did involve a few little sticky-tricky moments. Don’t look too closely at the first shelf I did, but I must say that I got REALLY good at it by the last shelf. A few hints:
- First, measure your space very carefully and contact the contact paper correctly using both a measuring tape and the lines on the back of the paper.
- When going around tricky corners, try installing most of the paper and then drawing a little line in place to help you trim the correct shape (see pics below).
- Put the paper in place and then slowly begin to peel the back off while you gently press it down, working out any bubbles as you go.
Keep going until you have papered your pantry to your absolute hearts content (some beautiful pantry peeps have even papered or painted the backs of theirs for extra pretty! Check out the IHEART Organizing Pantry Roundup for some more gorgeous inspiration pics!
Now time for the key element: Food Organization. I sorted and organized my food into the new appropriate storage containers. I labeled the food containers appropriately (I will write about making labels in a future post because this one is already way too long) and then placed them back in the order I had planned. Check out the finished project:
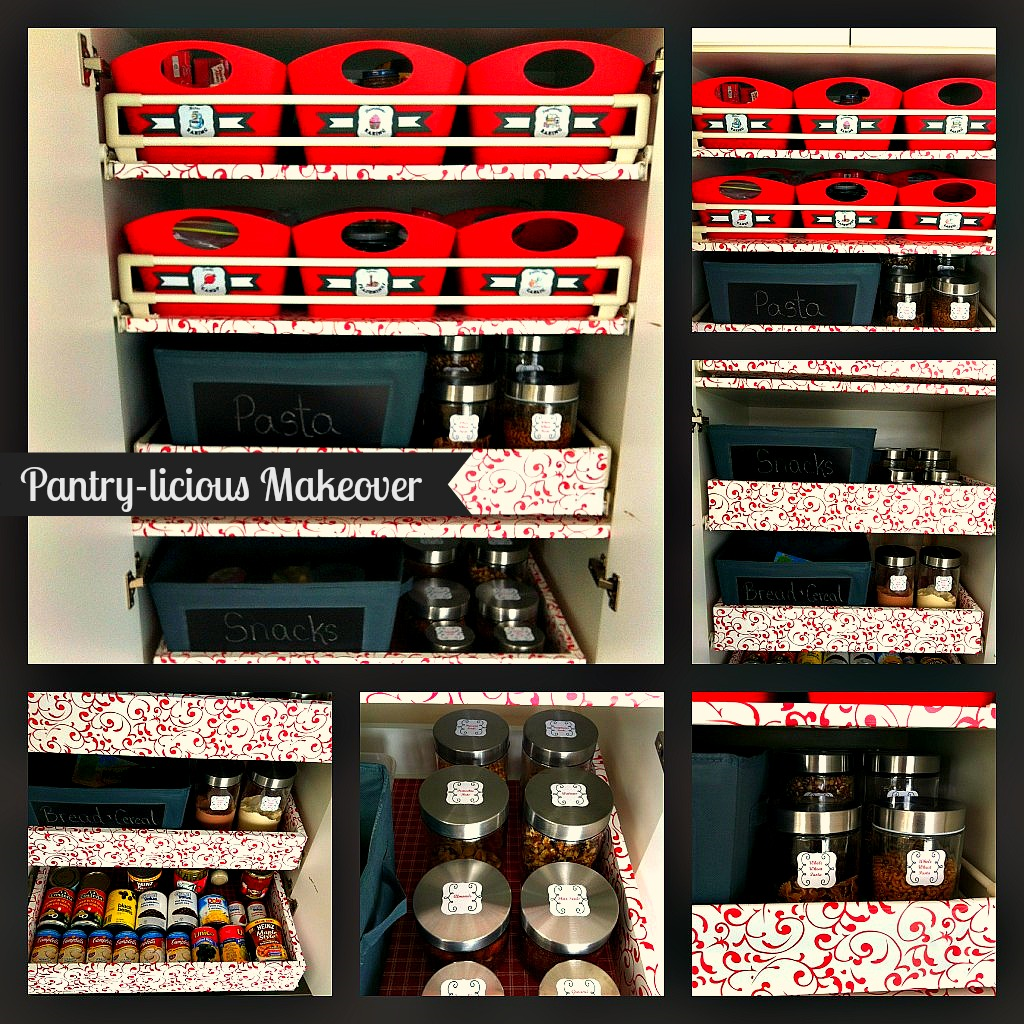
Here is a closer before and after of the bottom two drawers…
… the middle drawers…
…and of the top two pull out shelves:
I am pretty thrilled every time I open our pantry now and I LOVE being able to find what I need so easily. I have big plans for the inside of the doors (plans that may or may not involve DIY chalkboard paint… post coming soon:). And the best part was that I managed to create enough space by being superbly organized to free up an ENTIRE upper cabinet in the kitchen! Wow! That space will come in handy very soon when we undertake a little kitchen revamp that involves removing the doors from some upper cabinets…
One more before and after pic, just because I love them:
If your pantry has not received any love and attention in a long while, consider giving it some. It will pay you back in spades!
And remember, my housie friends, HOME wasn’t built in a day. Enjoy the journey!
Linking to April’s Pinterest Challenge at Happy Go Lucky

Thank-you : IT is nice to know about the black foam board
:that will probably be the winner lol. I will send pics when get mine done .
Robin
Hey again Krista,
I love the red baskets with kind of an Indian style label, too
I am searching hi and low for the collapsible storage baskets. I e-mailed the Dollorama company but they do not take orders online. I am in North Carolina and the only place that showed one was a couple of hours from here.
Mostly upper America and Canada.
Would you mind if I posted a picture of just he basket to see if anyone knows where I can get them?
I have some chalkboard paint in all colors may just have to make me some lol
Have a good week.
Thank-you Robin
Hi Robin!
You are on quite the hunt:) Go ahead and post a picture if you like. You might be able to get a slightly different style of basket and add a chalkboard label to it with some glue – in my linen closet I used old wicker baskets that I had and then framed small pieces of black foam board – you can write on it just like a chalkboard. Otherwise Martha Stewart for Avery (line of products) has peel and stick chalkboard labels that you could attach to a fabric basket. Places that sell those Rubbermaid storage cube units (you know, the shelf units that have square cube shaped openings) have matching square collapsible baskets to fit in the cubes. I know that our local Walmart sells those. You could always add a chalkboard sticker label to some of those… Good luck with your project!! Let me know how it turns out:)
Krista
I love all your organizing stuff. Where did you get the collapsible baskets?
Thank-you Robin
Thank you Robin! I picked those up at the local dollar store, called Dollarama. I think they were 2$ each and I loved the little ‘chalkboard’ on the front!
do you know the brand name or the company who makes the jars there arent any dollar stores in my area and i would like to see if i can buy them online.
I can’t remember off the top of my head… but I will check at the store in the next day or two and send you a response!
Krista
This is really quite an amazing transformation. I did something similar this fall with our pantry this fall – – it actually was one of my first blog entries ever (don’t judge! ha ha). http://www.thinkingcloset.com/2012/09/07/if-you-like-it-then-youd-better-put-a-label-on-it-tutorial/
Also, I love your blog tagline. It really resonates with me because this is the first year where I’ve felt I had the time to devote to making our house a home. And I’m lovin’ it.
Thanks for your comment on my blog! So great to “meet” you!
Thanks for stopping by Lauren – I checked out your pantry transformation. Love the DIY Chalkboard Labels and the turqouise baskets are adorable!
Krista
I ENVY your pantry Krista!!!! Love all the details!
Thanks Vel!
You did a super amazing job on the pantry!!
Would love for you to come link up to Handmade Tuesdays @ wwww.ladybug-blessings.com
Kristen
Thanks! I will definitely check that out!
Krista
Wow, what a difference! I am truly impressed!
Thanks! And thanks for reading:)
Love it Krista!!!!
Thanks Christine… I have a little something in the works for the doors too..
Question: did you label your baskets with labels you made, or with ones you sourced online?
Second question, nope comment: you should post a link or upload a PDF so we can copy you!
Final Comment: feel free to come over and re-do my pantry also.
xo
Hi Megan! I will post soon about how I made the labels… Tomorrow perhaps? I have an easy little secret up my sleeve:) Krista